Link a Document's Work Items
You can link the Work Items defined in a Document to other items in the same Document, in a different Document, or stored directly in the Tracker. Links can denote structure and provide traceability. For example, in a requirements specification Document, Work Items of the Requirement type may be structured with parent-child relationships where one item is the parent of one or more others. This type of structure is most easily and naturally done with hierarchical headings and/or indentation — of paragraphs or list items, for example. For information, see Structure a Document's Work Items.
Linking for traceability may require linking Work Items defined in one Document to Work Items defined in a different Document, or created directly in the integrated Tracker. For example, you would probably want to link Work Items of the Requirement type, defined in a requirements specification Document, to items of the Test Case type that verify the requirements. The Test Case items might be defined in another section of the same Document, in another Document, or created directly in the Tracker. For more complete information, see Link Work Items.
The following sections explain how to link Work Items to each other in the same Document, how to link Work Items in one Document to items in a different Document, and how to link Work Items in a Document to Work Items created directly in the Tracker.
No links are created in the system until you save the Document in which you originate the link(s). If you accidentally create a pending link to the wrong target item, you can click the X icon in the link detail panel and then confirm the prompt to cancel changes. You can then begin the linking operation again.
When linking to multiple Work Items, you can specify a different link role for different target items. For example, you might link from a Requirement to a Test Case with a link role named verifies, and to another requirement with one named refines. You select the link role in the link detail panel after clicking the link icon on each target Work Item.
Link within a single Document
You can link one Work Item in a Document to another single item, or several target Work Items in the same Document all at once. For this operation, you only need one browser tab.
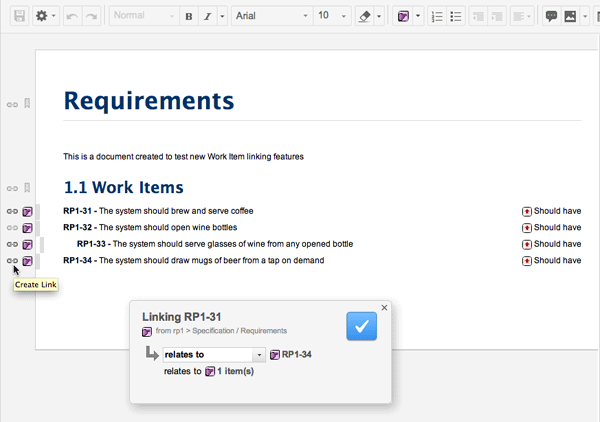
Refer to the above figure for the following steps.
Click on the
 icon in the left margin of the Work Item you want to link to some other Work Item. The link detail panel appears.
In the link detail panel, select the link role for the link you are creating. This describes the relationship of the source item to the target item(s) — relates to or depends on, for example.
Locate the first Work Item you are linking to, and click the Link icon to the left of it.
If you want to link to multiple Work Items, hold down Ctrl (Windows) or Command (Mac and others), and click the
(Create Link) icon of each target Work Item. The panel reports the items linked each time you click.Save the Document. The links are not created in the repository or logged to the Document history until you save.
You can view the items to which any Work Item is linked by clicking on the item in the Document and opening the Work Item Properties pane of the Document sidebar.
Link across different Documents
You can link a Work Item in one Document to another single item in a different Document, or to several target Work Items in a different Document all at once.
This linking is easiest if you open 2 browser tabs or windows: one displaying the Document containing the Work Item(s) you want to link (referred to as Tab 1), and the other (Tab 2) displaying the Document or Tracker view containing the Work Item(s) you want to link to.
To link Work Items in different Documents:
In one browser tab or window (Tab 1), open the Document containing the Work Item(s) you want to link.
In a second browser tab or window (Tab 2), open the Document containing the target Work Item(s).
That is, the item(s) you want to link to from some item(s) contained in the first Document (in Tab 1).
In Tab 1, select a Work Item to link by clicking on the
(Create Link) icon in the item's left margin. The link detail panel appears in both browser instances.In the link detail panel, select the link role for the link you are creating. This describes the relationship of the source item to the target item(s)— Relates to or Depends on, for example.
Switch to Tab 2. If you want to link the item in Tab 1 to multiple items in Tab 2, press and hold Ctrl or Command (depending on your operating system).
Click the
(Create Link) icon beside the first target Work Item in Tab 2. To link to one or more additional items in this target Document, click their link icons while continuing to hold down the Ctrl or Command key.Switch back to Tab 1 and save that Document (the one from which you started the link operation) to create the links in the repository and Document history.
You can link new Work Items in a target Document as you create them. When you begin a link from a Work Item in one Document (in Tab 1), then if you switch to a different Document (in Tab 2), and you create new Work Items there, links to the new items are automatically created and added in the link detail panel.
You can link a Work Item to one or more items in a historical revision of a target Document. For example, you might link the current revision of a Business Case item to the version of a Requirement in a functional specification Document that has been saved in a Project Baseline. To do this, open in Tab 2 the Project Baseline containing the revision of the Document, and then open the Document containing the items you want to link to.
Link from Document to Tracker
You can link a Work Item contained in a Document to one or more Work Items created in the Tracker that are not contained in any Document. You can link to a single target item, or multiple target items at once. As in the previous section, you should use 2 browser tabs.
In one browser tab (Tab 1), open the Document containing the Work Item(s) you want to link.
In a second browser tab (Tab 2), open the
 Table view (Navigation
 Work Items), and run a query to retrieve the target Work Item(s) and list them in the table.
In Tab 1, select a Work Item to link by clicking on the
(Create Link) icon in the item's left margin. The link detail panel appears in both browser instances.In the link detail panel, select the link role for the link you are creating. This describes the relationship of the source item to the target item(s)— relates to or depends on, for example.
Switch to Tab 2. If you want to link the item in Tab 1 to multiple items in Tab 2, press and hold Ctrl or Command (depending on your operating system).
In the table in Tab 2, locate the first target Work Item and click the
(Create Link) icon on its row in the table. To link to one or more additional items in the table, click the link icon on their respective table rows while continuing to hold down the Ctrl or Command key.Note:Each target item can be linked with a different link role. Change the role in the link detail panel after Ctrl / Command clicking an item.
Switch back to Tab 1 and save the Document to create the links in the repository and Document history.
You can link Work Items using other tools in the Polarion portal. You can use the Linked Work Items section in the Work Item editor (Navigation![]()
 Work Items
![]() Table view). If your license provides the feature, you can also link Work Items in the
Table view). If your license provides the feature, you can also link Work Items in the  Matrix view.
See also:
Manage existing links
Use the Edit Links button in the Properties page of the Document sidebar to launch the Linked Work Items dialog box. There, you can manage the links of the currently selected Work Item in your Document. You can use the dialog box as an alternate way to add one or more links to a selected Work Item, as well as to edit some properties of existing links, or remove some existing links. For details about this dialog, please see Linked Work Items Dialog