Work Item Properties sidebar
This sidebar shows Work Item data fields that can be viewed and in some cases edited right within a  Live Document or
  Page.
Page.
The panel also shows outgoing links from the Work Item currently selected in the Document. Users can access the linked items, create new links via pasting, and to manage links in a pop-up dialog.
You can configure the sidebar so that Hyperlinks, Linked Revisions and other Work Item fields are also visible.
Component Descriptions:
 Sidebar settings
Displays a menu with options applicable to this sidebar.
Shows the ID and Title of the Work Item currently selected in the Document body.
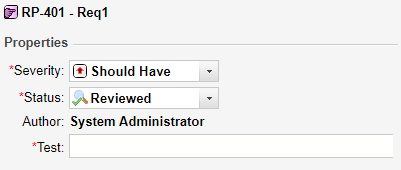
Displays edit controls for the Work Item data fields currently enabled for editing from the Document.
Displays the type icon, ID, and Title of all Work Items that the currently selected Work Item has outbound links to. Each item is a hyperlink. If the target item is in the same Document, the link leads to the properties of the linked Work Item, which display in this panel and replace the previous information. If the link is to an item external to the Document, the item opens in s separate browser tab or window.
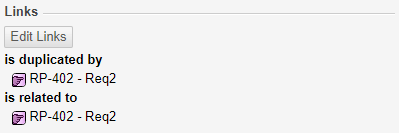
Multiple links are split into categories according to link role — has parent, or implements, for example.
Launches the Linked Work Items dialog where you can  Add or
  Remove related Work Item(s) to the selected Work Item.
If you know the Work Item ID(s) that you'd like to add:
Click on a Work Item within the Document.
The Work Item's left margin is highlighted yellow.

Click Edit Links on the Work Item Properties sidebar.
The Linked Work Items dialog box appears.
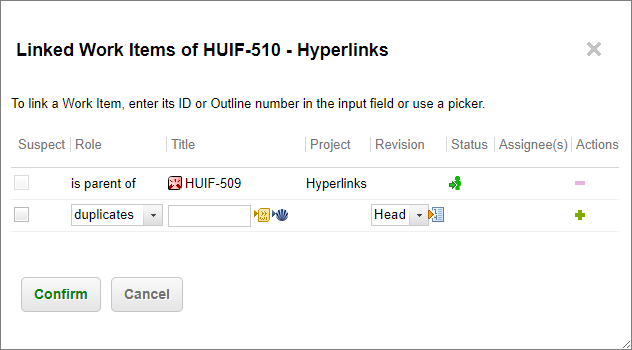
Enter the Work Item ID you want to add in the Title and click
. Select a Role for the Work Item from the drop-down box.
Repeat steps 3 and 4 for all the Work Items that you want to add.
Click Confirm when you've finished adding Work Items.
If you don't know the Work Item ID(s) that you'd like to add:
Click on a Work Item within the Document.
The Work Item's left margin is highlighted yellow.
Click Edit Links on the Work Item Properties sidebar.
The Linked Work Items dialog box appears.
Click

The Work Item Picker dialog box appears.
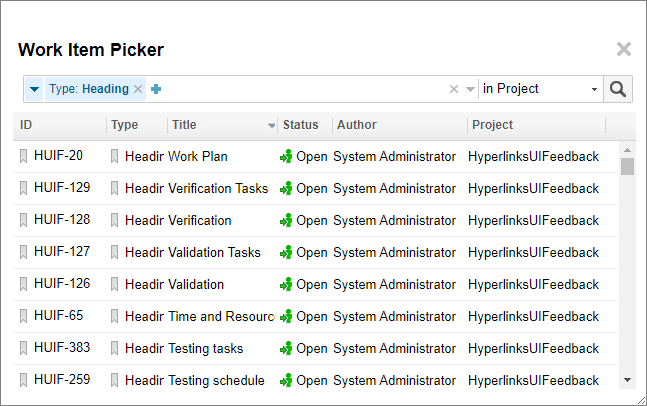
Select the scope (Document, Project or Repository) in the drop-down box on the right.
(Optional) Click
 to filter your query graphically. (For example by type.)
 Click on a Work Item that you want add.
Select a Role for the Work Item from the drop-down box.
Click
and repeat steps 3 to 7 for all the Work Items that you want to add.Click Confirm when you've finished adding Work Items.
Remove a Linked Work Item:
Click on a Work Item within the Document.
The Work Item's left margin is highlighted yellow.
Click Edit Links on the Work Item Properties sidebar.
The Linked Work Items dialog box appears.
Click
on the right of the Work Item(s) that you want to remove.Click Confirm.
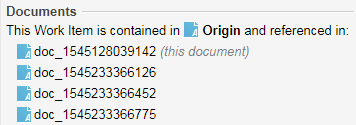
Displays the name of the Document that contains the selected Work Item, and the names of other Documents that the selected Work Item is referenced in (if any). When a reference is clicked it opens the document in a new browser tab.
The number of Document references displayed is set to 20 by default but can be changed via the following property in the polarion.properties file:
com.siemens.polarion.ui.referencingDocuments.softLimit=20
(The most recently updated documents appear at the top of the list.)
Due to possible Document optimizations for performance, the displayed result may not accurately represent the total number of times that the Work Item is referenced.
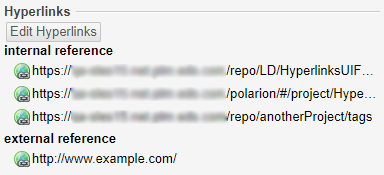
Displays the hyperlinks that are contained within the  Hyperlinks section of a Work Item.
The internal and external reference titles above are customizable fields defined in the hyperlink-role-enum.xml file.
Edit Hyperlinks:
Add or remove hyperlinks for the selected Work Item.
(Can also be done in the Hyperlinks extension of the Work Item.)
Add a link:
Click on a Work Item within the Document.
The Work Item's left margin is highlighted yellow.
Click Edit Hyperlink.
The Hyperlinks from Work Item dialog box appears.
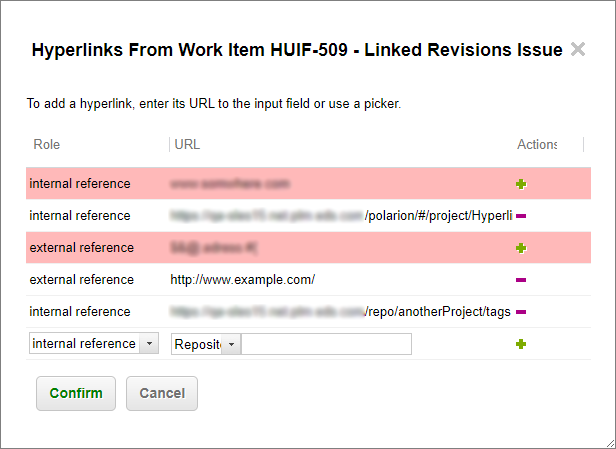
Select a link Role in the drop-down box.
(Link Roles are customizable.)
Select a URL type in the drop-down box.
Enter the link and click
.Click Confirm.
Remove a link:
Click on a Work Item within the Document.
The Work Item's left margin is highlighted yellow.
Click Edit Hyperlink.
The Hyperlinks from Work Item dialog box appears.
Click
beside the link(s) you want to remove.Click Confirm.
Removed links will be highlighted in red until the document is saved.
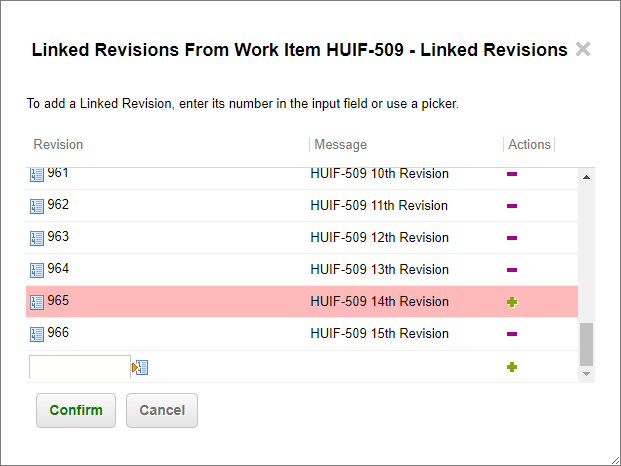
Displays the first 20 revisions (by default) contained within the  Linked Revisions extension of a Work Item.
(Administrators can configure the default number of Linked Revisions that appear in the sidebar.)
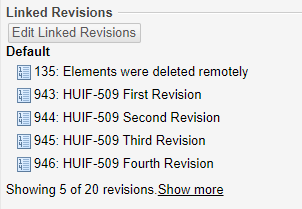
Click Show more to launch the Work Item in a new browser tab and view all Linked Revisions .
Add Linked Revisions:
When a new Linked Revision is added, its Message will be rendered in the sidebar after the Document is saved.
Click on a Work Item within the Document.
The Work Item's left margin is highlighted yellow.
Click Edit Linked Revisions on the Work Item Properties sidebar.
The Linked Revisions dialog box appears.
Click
beside the  Revision(s) you want to add.
Search for and add a specific revision:
Click on a Work Item within the Document.
The Work Item's left margin is highlighted yellow.
Click Edit Linked Revisions on the Work Item Properties sidebar.
Scroll to the bottom of the dialog box and click
.(The Revision Picker dialog box appears.)
(Optional) click on a revision's Message to view its details.
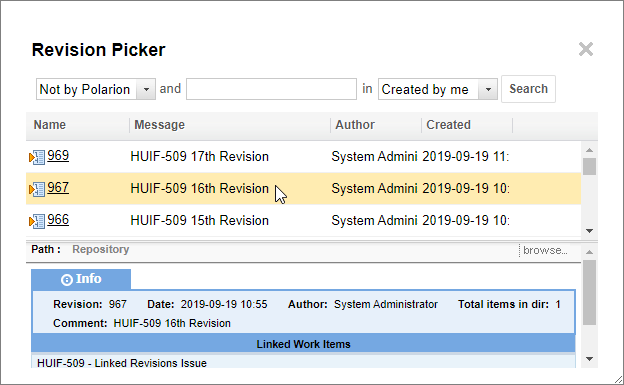
Click on the revision's
Name.Click Confirm.
Remove a Linked Revision:
Click on a Work Item within the Document.
The Work Item's left margin is highlighted yellow.
Click Edit Linked Revisions on the Work Item Properties sidebar.
Click
beside the revision(s) you'd like to remove.Click Confirm.
Removed revisions will be highlighted in red until the document is saved.
Hyperlink and Linked Revision items with long names are truncated, but you can hold the mouse over them to view their full name in their tooltip.
Sidebar settings
You can specify which data fields appear in the panel, and in what order.
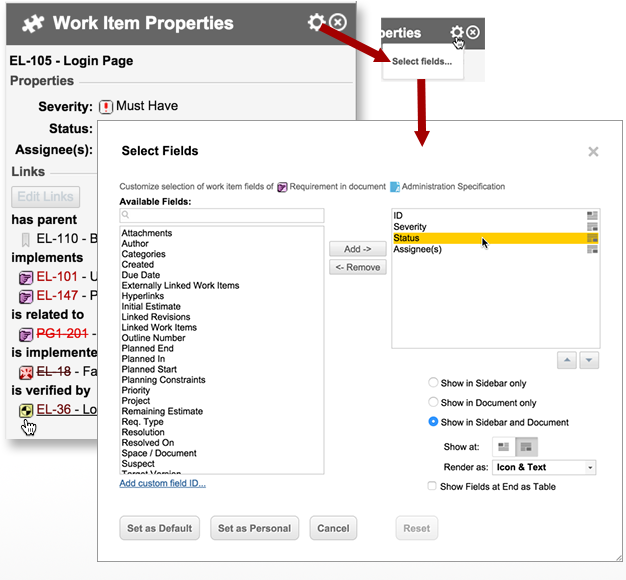
The Select Fields menu option leads to the Select Fields dialog. The dialog displays a list of all standard fields for the Work Item currently selected in the Document. Custom fields may be added to the list of Available Fields using the link Add Custom Field ID. Fields in the list on the right appear in the Fields section of the panel. User can remove fields by selecting fields in the right-hand list and clicking Remove button, or add fields by selecting them in the Available Fields list and clicking Add button. Fields can be moved up or down in the list by first selecting, then clicking either the Up or Down button in the dialog. The Reset button returns the Work Item selection to the default settings.
The Set as Default button applies the changes and makes them the default for the Document. Other users will see the selected fields in the Work Item Properties sidebar. The Set as Personal button applies the changes and makes them the default for the current users. Other users see the Document default fields in the sidebar.
When a field is selected in the right-hand list, several options appear in the dialog for how to display the field.
The field only appears in the Document sidebar.
The field only appears in the Document.
The field appears in both Document and Document sidebar.
Appears only if option to show field in Document is selected. Controls whether to show the field at the start or end of Work Items.
Controls whether the Work Item in the Document displays as icon, text, or both. Appears only for Polarion fields that have an associated icon, and only if the option to show the field in the Document is selected.
If selected, any fields having option set to show them at the end of Work Items will be formatted as a table.


Grayed out fields can only be removed when the report is in Edit mode.
The fields appear in the Work Item Properties sidebar for all Kanban, Table and Work Items Board widgets.
Fields added by a user (when not in Edit mode), are only be visible to them.
Add fields in Edit mode above if you'd like other users to also view them by default.
The added fields only appear for the selected Work Item type (


 ) and
) and  Project.