Configure IC Verification Assistant (ICVA)
Once the ICVA template is installed the following XML configuration is done automatically but you can still tailor it to your needs if required.
What you need
The IC Verification Assistant extension installed.
The IC Verification Assistant widgets added to the global repository.
An applied IC Verification Assistant license.
(Optional) A customized ICVA XML configuration file.
(The ICVA template will preconfigure the XML file, but you can customize it following the instructions below.)
Users must be assigned either the project_assignable or project_admin roles in Polarion to Upload, Export or Import via the IC Verification Assistant sidebar.
Customize the XML file
Enter
 Administration
 IC Verification Assistant.
The configuration page appears.
<?xml version="1.0" encoding="UTF-8"?>
<icva-settings>
<link-role-id>link</link-role-id>
<testrun-template-id>Regression Results</testrun-template-id>
<goal-custom-field-id>goal</goal-custom-field-id>
<weight-custom-field-id>weight</weight-custom-field-id>
<ci-name-custom-field-id>ciName</ci-name-custom-field-id>
<coverage-custom-field-id>coverage</coverage-custom-field-id>
<objects-custom-field-id>objects</objects-custom-field-id>
<ci-list-ui-limit>150</ci-list-ui-limit>
<coverage-item-types>
<workitem-id has-full-path-only="false">assertion</workitem-id>
<workitem-id has-full-path-only="true">branch</workitem-id>
<workitem-id has-full-path-only="true">condition</workitem-id>
<workitem-id has-full-path-only="false">covergroup</workitem-id>
<workitem-id has-full-path-only="false">coveritem</workitem-id>
<workitem-id has-full-path-only="false">coverpoint</workitem-id>
<workitem-id has-full-path-only="false">cross</workitem-id>
<workitem-id has-full-path-only="false">directive</workitem-id>
<workitem-id has-full-path-only="true">du</workitem-id>
<workitem-id has-full-path-only="true">expression</workitem-id>
<workitem-id has-full-path-only="true">fsm</workitem-id>
<workitem-id has-full-path-only="true">instance</workitem-id>
<workitem-id has-full-path-only="false">tag</workitem-id>
<workitem-id has-full-path-only="true">toggle</workitem-id>
<workitem-id has-full-path-only="true">test</workitem-id>
<workitem-id has-full-path-only="false">rule</workitem-id>
</coverage-item-types>Note:The Bin type is currently not supported.
Enter a Link Role ID using the <link-role-id> tag within the main <icva-settings> tag.
Link role ID defines the relation between Verification Requirements and Coverage Items.
Define the link role to use for the relation between Verification Requirements and Coverage Items and enter the link role's ID.
Enter a Test Run template ID using the <testrun-template-id> tag within the main <icva-settings> tag.
Defines which Test Run or Test Run template to use as a template for creating new Test Runs when importing the results of automated tests.
(Enter the ID of an existing Test Run or Test Run template from the current project.)
Enter a Custom field ID for Goal using the <goal-custom-field-id> tag within the main <icva-settings> tag
A Goal is specified as a percentage value (0 to 100) for a particular coverage object. Supports fractional values. (99.9%.)
Administrators must first create a Goal custom field for the Work Item type that represents the Verification Result. There you can also define a default value for the Goal field.
Enter a Custom field ID for Weight using the <weight-custom-field-id> tag within the main <icva-settings> tag.
Weight is an integer value (from 0) used to calculate the weighted averages of the parent sections.
A weight of 0 excludes the item from coverage.
A weight of 0 for all children excludes the parent scope.
In the custom fields administration section you must first create the Weight custom field for the Work Item type representing the Verification Result. Then define a default value for the Weight field.
Then enter the ID of the Weight custom field that you define into this tag.
Enter a custom field ID for the Coverage Item name defined using the <ci-name-custom-field-id> tag within the main <icva-settings> tag.
It's a custom field that stores the Coverage Item's short name or the full path of the Work Item representing a specific Coverage Item type. It must be defined for the Coverage Item type in Polarion's Work Item custom field configuration.
Then enter the ID of the custom field that you define into this tag.
Add the <coverage-custom-field-id> tag within the main <icva-settings> tag.
Has to do with Derived fields. No customization is required.
Add the <objects-custom-field-id> tag within the main <icva-settings> tag.
Has to do with Derived fields. No customization is required.
Define the Coverage Item Types you plan to use via the <workitem-id> tags found within a <coverage-item-types> tag inside the main <icva-settings> tag. (Must contain at least one value.)
The Work Item types that represent Coverage Item types must first be defined for the project.
Then enter the IDs of the Work Item types that you define into the corresponding tags.
The <workitem-id has-full-path-only="true"> value (true or false) determines whether the Include Full Path option on the Coverage Items from UCDB dialog box is enabled by default and the option to view the short path is disabled.
true: Only the full path is displayed.
(The option to select Include full path when adding an item from Coverage is disabled.)
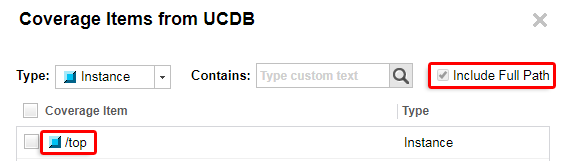
false: Both the short and long paths can be displayed.
(The Include full path option is disabled by default and the short path is shown.)
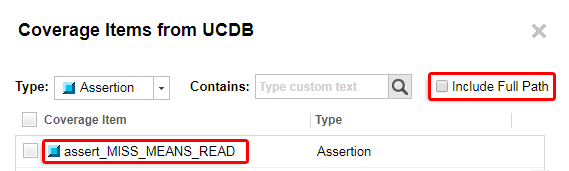
Note:The following Coverage Item Types will only display their full path even if you set them to false.
(Instance, Branch, Condition, Expression, Fsm, Toggle, DU and Test.)
(Optional) Define a Coverage Item list limit using the ci-list-ui-limit tag within the main <icva-settings> tag.
Defines the item list limit for the Add from Coverage dialog box. If not configured a default value of 200 will be used.
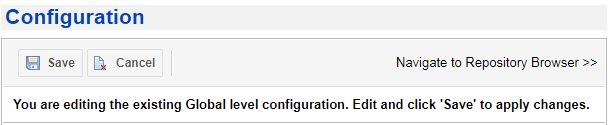
Click
 Save.
Save.