Edit the Description field
The Description field is a special field type that supports basic text formatting, images, tables, and hyperlinks. When you edit the field, a toolbar displays above the text field and provides access to the formatting and other features. The Description field is editable when the Work Item is in Edit mode. If the Work Item is not in Edit mode, you can edit just the Description by clicking the Edit button. Features of the description look as follows:
Format text
The following text formatting features are available in the Description field:
 Bold font
 Italic font
 Underlined font
 Strike-thru font
 Superscript font
 Subscript font
 Text Color
 Background Color
Font family (drop-down menu)
Font size (drop-down menu)
 Remove formatting
 Convert to Plain Text
 Bullet list (unordered list)
 Outdent text
 Indent text
 Left-aligned text
 Centered text
 Right-aligned text

Text formatting features work in that same way as most word processors. For example, you can select some text and apply some formatting to just the selected text. Or you can position the caret and select formatting, and then everything that comes after has the specified formatting until you change it. The toolbar also provides the Remove Formatting of Selected Text button, which removes all formatting from selected text.
It is possible to configure Custom Fields with the same rich-text features as the Description field. For information, see Implementing Rich-text Custom Fields
Available fonts can be configured by an administrator.
Background color is only available for text. Background color of table cells cannot currently be formatted. Most browsers do not print text background color by default. If such printing is desired, it may be necessary to change the browser's print options or settings.
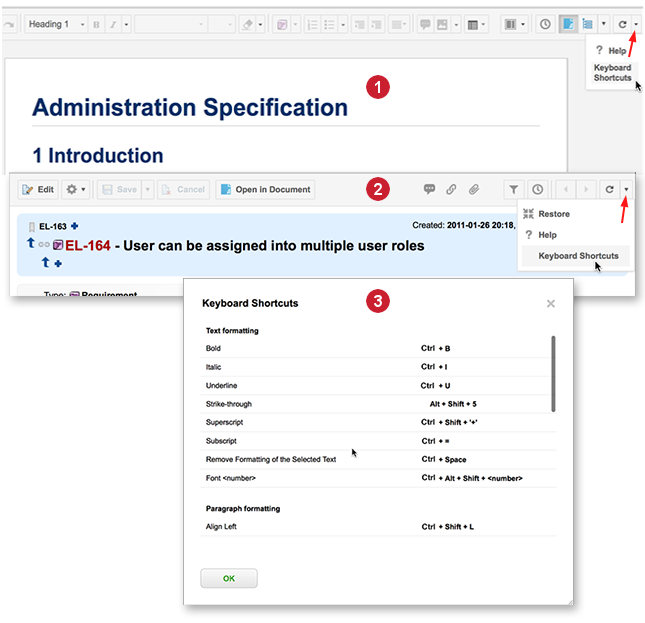
Keyboard shortcuts
Keyboard shortcuts in the Description field (and other rich-text type fields) are similar to those of applications such as Microsoft Word and Google Documents. A comprehensive reference dialog box, context-sensitive for your operating system, is available via the Keyboard Shortcuts item on the Help menu of the respective editors.
How to access Keyboard Shortcuts reference dialog box in Work Items:
|
|
|
 Document editor.
 Work Item details section.
 Shortcut for the OS you are using.
Insert images or attachment previews
You can display images or attachment previews in the Description field of Work Items. (Or any other field of the Rich Text type). When you are focused on this field, the text formatting toolbar appears in the Work Item Editor toolbar. It contains a  button that enables you to select an image or attachment file and insert it in the Work Item description.
After inserting an image or attachment preview, you can add a Caption above or below it, Resize it, or launch a full screen Preview of it.
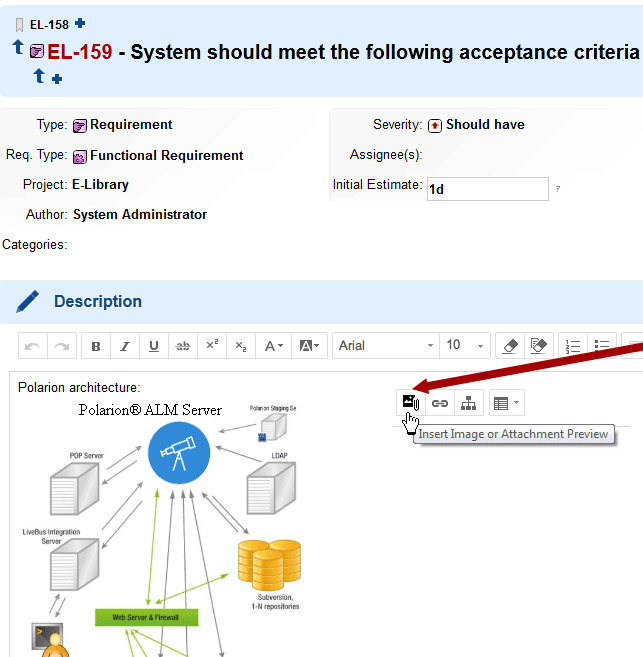
You can insert an image or an attachment preview a Work Item's Description or Rich Text fields.
Paste images from the clipboard
With some limitations (see Note below), you can paste an image from your clipboard into a rich text field. If there is a mixture of images and text in the clipboard, then only the name of the image file is pasted, and not the image itself. When you paste an image, an attachment is automatically created with file name screenshot-[timestamp].png, where [timestamp] is the date-time when the image was pasted. Supported image formats are: BMP, JPG, PNG, and GIF.
To paste an image from your clipboard, simply locate the insert point where you want the image to appear in the rich text field and use your browser's Paste keyboard shortcut or menu command.
Insert a table
When the Description field is in Edit mode, the  (table) button provides a menu with options for inserting and managing a table in the field. If the caret is not currently placed in a table, only the Insert Table command is available. All other commands are available when the caret is inside a table. When a table exists, you can:
Insert columns and rows.
Move columns and rows.
Delete columns, rows, or the entire table.
Access table properties.
Add a caption above or below it. For more information, see the reference topic Captions.
Make sure the field is in Edit mode and place the caret on a new line.
Click
(table) on the toolbar and choose Insert Table from the menu. The Insert Table dialog box appears.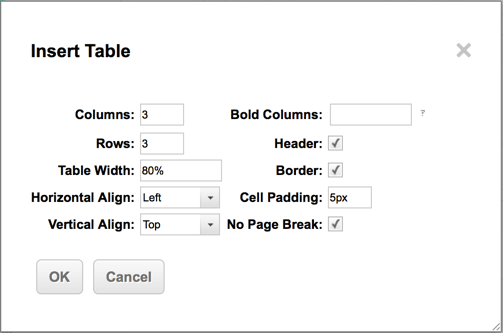
This dialog box is also accessible from Table Properties menu.
In the Insert Table dialog box, set the properties for the new table as desired. (You can modify them later using the Table Properties command on the menu.) Most of the properties are self-explanatory.
The Bold Columns property enables you to reformat one or more columns to use bold font. For example, if you want bold text in the first column, enter 1 in this property.
The No Page Break property, when checked, prevents a page break from occurring in the table when the Work Item is exported to PDF or for Word Round-trip.
After inserting a table, click inside any cell to enter text. All of the Description field's text formatting options are available for text in table cells.
You can also insert images in cells in the same way as described in insert images.
Table columns are self-sizing. You will notice some variation as you enter content in cells. Just enter your content in the cells, and the end result should look okay. If necessary you can increase or decrease the width of the table in the Table Properties.
You cannot paste the following into a table:
Another table
Work Items or Headings
Hold Shift and right-click to override the table's context menu to paste via the browsers context menu.
Once inserted the following actions are supported:
Copy Rows or Cut Rows.
Paste Rows to the same or another table. Pasted rows insert above the current row. If pasted rows contain more columns than the target table, columns are added to the target table on the right.
Merge or Unmerge cells.
(Hold CTRL, select the cells that you want to merge, right click and select Merge.)
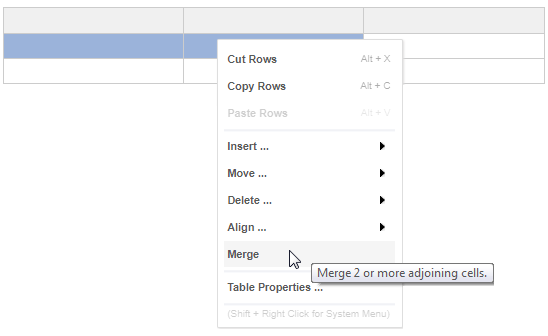
To unmerge previously merged cells, click on a merged cell, and then right-click and select Unmerge.
Merge / Unmerge in Description-based test cases
Description field-based Test Cases that use a table in the Description field as the source for the test execution extension are affected by the merge command. If you Merge the cells of a test execution table, the test execution extension does not work. Avoid merging cells in description based Test Cases.
Compare historical changes after using Merge
See Compare table changes when cells have been merged for details on comparing historical changes and how merging tables affects it.
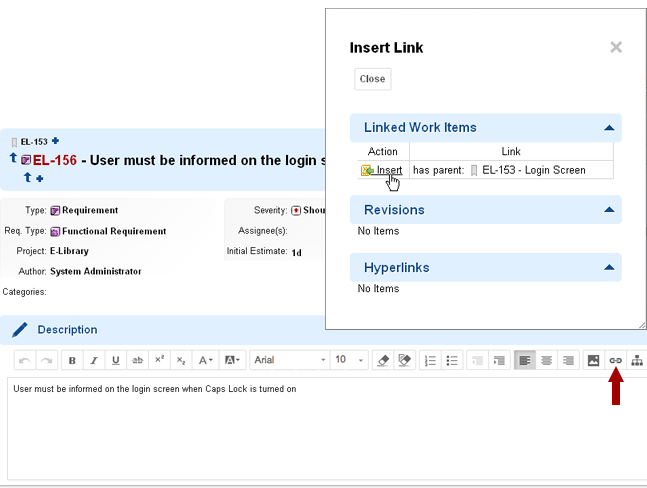
Insert hyperlinks
You can insert hyperlinks in the Description field of Work Items using the Insert Link button on the Work Item editor toolbar when the Work Item is in Edit mode. Links are local to the Work Item. That is, you can only create links to things that are linked to the Work Item:
Work Items appearing in the Linked Work Items section.
Revisions appearing in the Linked Revisions section.
Depending on the configuration of, and current selection in the interface list (in the Tool view of Navigation), these resources may not appear in the Work Item form for some users. Placing a hyperlink in the description provides exposure in the Work Item Description (always visible) of potentially hidden linked resources.
Insert a diagram
Polarion provides the Diagram Editor tool for creating and editing diagrams. You can use it to create and edit diagrams in the Description field of Work Items in the Table view of the Work Items Tracker, or any Rich Text custom field.
For information on using this feature, see Diagram Editor.
Insert a mathematical formula
You can add  Mathematical Formulas to a LiveDoc or Work Item rich text field.
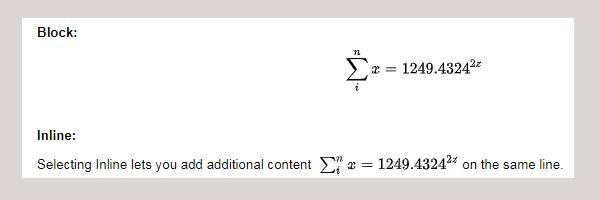
The formulas support LaTeX syntax.