Insert content
In addition to text, you can insert several other types of content into any region of a Page:
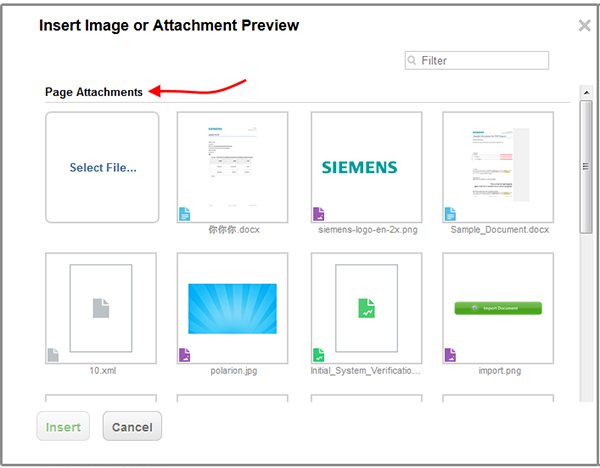
Insert image or attachment preview
The  button is available on the toolbars found on Pages, LiveDocs and Rich text Work Item fields. It launches the Insert Image or Attachment Preview dialog.
The dialog initially displays previews of images and attachments that are already attached.
It's also where new images or attachments with previews can be added.
Attachment previews for file types other than Images
Polarion supports image and attachment previews for all common image formats. To view previews for Visio files and the popular document formats (.pdf, .docx, .xlsx ) described below, Teamcenter Visualization Convert & Print Setup must be installed.
(See Polarion Preview Generator in the Windows installation document or Configure attachment preview generator in the Linux installation document for details.)
Add a new image or attachment
On the toolbar, click
.When you have images or attachments on a page (like a LiveReport page), only the images and attachments on the page itself appear. The images or attachments within the Work Items that appear in the page's widgets do not.
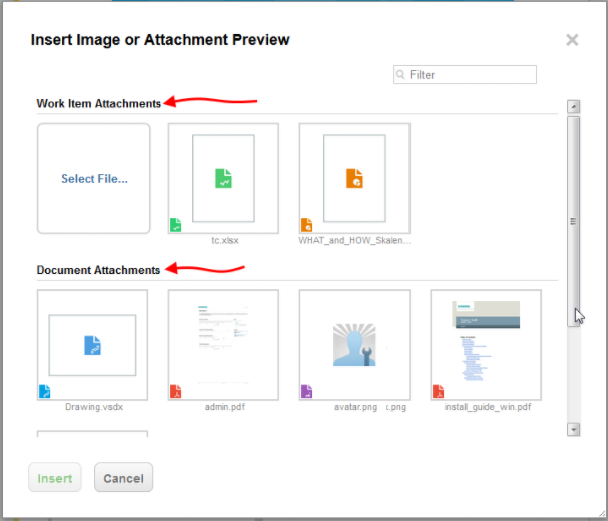
When you have images or attachments in both a LiveDoc and Work Item and the Insert Image or Attachment Preview dialog is opened inside a Work Item, both sections appear.
When you have images or attachments in both a LiveDoc and Work Item and the Insert Image or Attachment Preview dialog is opened from inside the LiveDoc, only the Document's images and attachments appear.
 Note:
Note:Hover over an image or attachment preview in the Insert Image or Attachment Preview dialog to see its file name and title (if any).
Click Select File.
Select one or more images or files to attach and click Insert.
To select multiple images or files, press Shift or Ctrl, and then select the files to Insert files at once.
Note:Unsupported characters in attachment names will either:
Prompt an error message.
Be replaced with _ (underscores).
If items with the same file names already exist, you will be prompted with the following message:
(When uploading a file with the same name as one already saved within a Work Item, the Revert option is not available and both files are saved with the same name.)
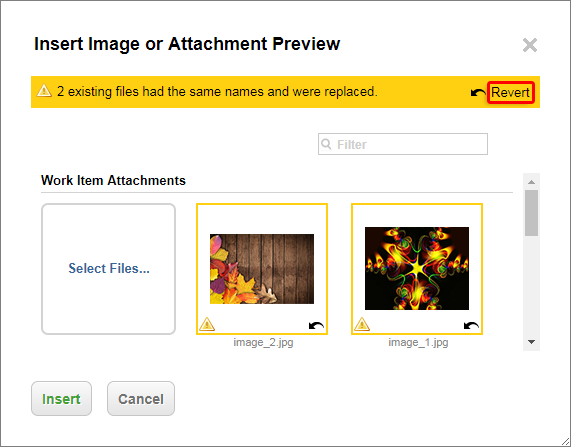
Click Revert to revert to the original files. Click Insert to add the ones you selected and confirm the overwrite.
Selected items are added and their previews appear in the Rich Page, LiveDoc, or Work Item.
Images and Visio diagrams with a width larger than 750px are resized, with their aspect ratio maintained, to a width of 750px.
(The width of the page when inserted into a Live Document.)
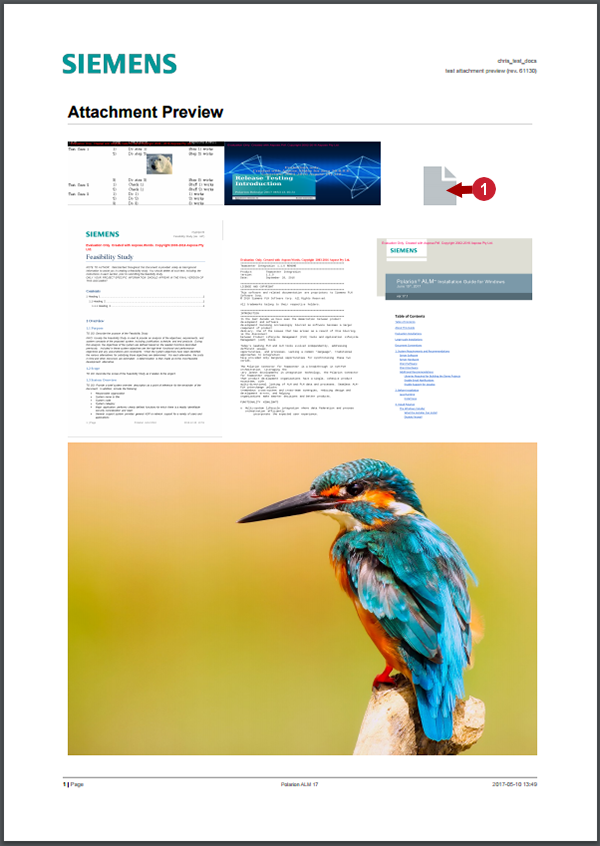
The previews of common document formats (like .docx, .pdf, .xlsx, and .txt) are resized to a width of 250px and take up one third of a Live Document page's width.
For less common file types, where previews cannot be generated, an icon is added instead. (See the image below.)
The Attachments are added to the Attachments sidebar and their previews are also visible when the document is Exported to PDF.
PDF output:
(
 Icon for less common file types.)
They appear even when the images or attachments themselves have not yet loaded, if On-demand Work Item Loading is ON.
(Optional) Filter the dialog with the
 Filter field.
Attaching Polarion Diagrams
You cannot insert a Polarion  diagram itself (the .mxg file) via the Insert Image or Attachment Preview dialog box. Instead a preview of the diagram will be added and the original .mxg file will be listed in the Attachments sidebar.
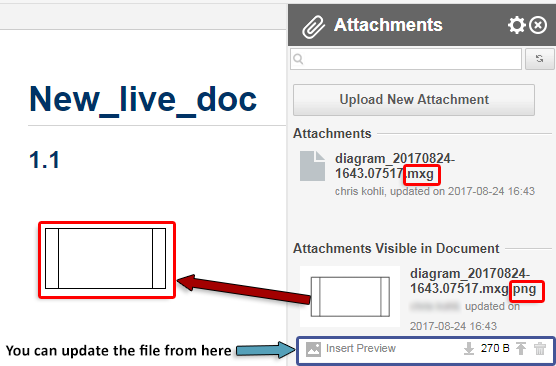
See the diagram section to create and edit diagrams directly into a Document, Page or Work Item text field.
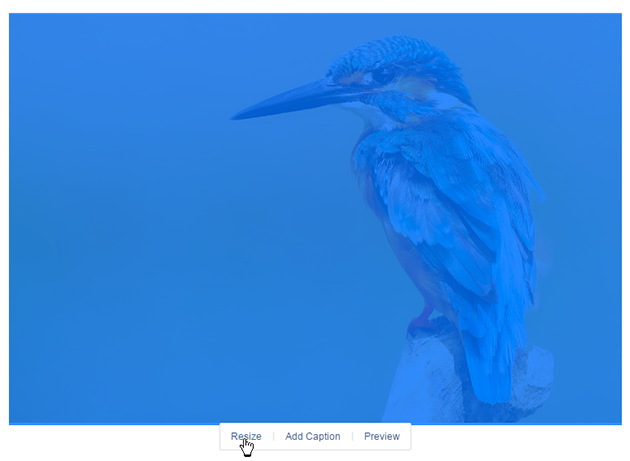
Resize an image or attachment preview
Select the image you wish to resize, and click Resize.
 Fit To Width: Resizes the image width to the document width. (Not available for Work Item Rich Text fields.)
 Reset Size: Resets the image size to its original dimensions.
 Keep Aspect Ratio: Active by default. Ensures that the height and width maintain the same ratio when resized.
Preview an image or attachment
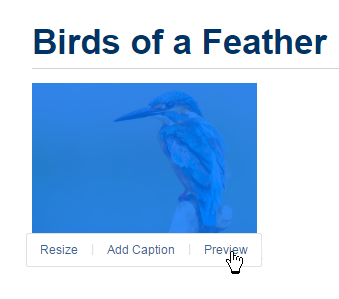
For a full screen preview of resized images or attachment previews in
 Edit mode, click on the image or attachment, and then click Preview.
(Or double-click on the image or attachment preview.)
When not in
Edit mode, a single click will launch a full screen preview.Click ESC to exit the full screen preview screen.

 View: Launches the object in its own browser window or the default program configured by the OS to open the selected file type.
 Download: Downloads the object to the browser's download folder.
![]() Update: Upload an updated version of the previewed object. (Disabled for read-only documents or for users with read-only permissions.)
Update: Upload an updated version of the previewed object. (Disabled for read-only documents or for users with read-only permissions.)
 Close: Closes the preview window. (ESC also closes the window.)
Inserted images, diagrams, or files become attachments of the Page, and remain attached even if visually removed from the Page content. To delete an image attachment completely, see Delete Attachments.
Adding URL links to images is not supported.
Pasting images
CTRL +V or Command +V can be used for images within the document, but if they are used for an image in a  Work Item within the document, its thumbnail will not appear in the Attachments sidebar.
Insert and manage attachments
Rich pages, Live documents and Work Item rich text fields can have almost any type of file as an attachment. Once an attachment has been uploaded, a link to it or a preview of it can be inserted directly into the document. Or it can simply be appended to the document by leaving it in the Attachments section of the Attachments sidebar.
Access attachments via the Attachments sidebar
Locate the desired Page by browsing or searching.
Click on
 at the top right and click
  Attachments.
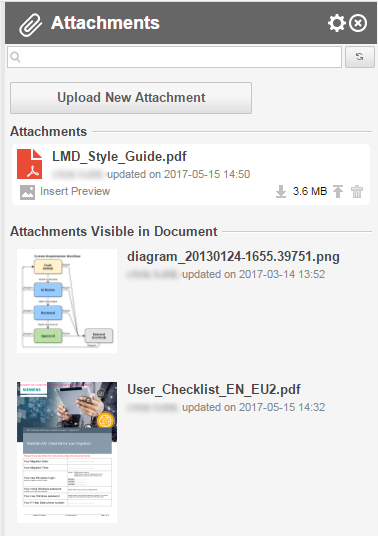
The Attachments sidebar appears listing the Attachments currently attached to the document and the Attachments Visible in Document.
Add a new attachment
Open the Attachments Sidebar.
Click Upload New Attachment, select the file to attach, and click Open.
The selected attachment appears under the Attachments section of the Attachments sidebar.
 Save the document.
If the attachment is an image, Visio diagram, or popular document format, a preview also appears within the Attachments sidebar. (An icon appears for less common formats.)
(Optional) To insert a preview of the attachment into the document, place the cursor at the desired spot within the document and click
Insert Preview.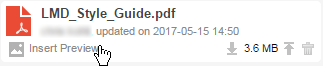
See Add a New Image or Attachment for details on how images and attachment previews appear.
Update an existing attachment
Suppose you have a PDF file attached to a Page, and at some point you find there is an updated version of the same document, with changed content. You can upload the updated version to replace the existing attachment. The uploaded file must be of the same type and have exactly the same file name and extension.
Open the Attachments sidebar.
Locate the attachment you want to update. If there are many attachments or some attachments are hidden, use the sidebar's search field.
Hover your pointer over the attachment you want to update. It highlights and exposes several icons.
Click the
 Update icon. Your operating system's file selection dialog appears.
Select the file in your local file system, and click the button that confirms the selection. Wait while the file uploads.
When the upload is complete, save the page to finish updating the attachment. It is now available to users viewing the page.
Delete an attachment
If you find some attachment is outdated or no longer needed, you can delete it from the Attachments sidebar. Keep in mind that if you have any links to the attachment file, you need to remove them from the Page content.
Locate the desired Page by browsing or searching, and open it for editing in the Page Designer.
On the Page Designer toolbar, click the Show Sidebar button and select Attachments to reveal the Attachments sidebar.
Locate the attachment you want to update. If there are many attachments or some attachments are hidden, use the search field of the sidebar.
Hover your pointer over the attachment you want to update. It highlights and exposes several icons.
Caution:Remember that any links to the deleted file will not work, so be sure to review the page content.
Click the
 (Delete) icon. The attachment no longer appears in the Attachments sidebar.
Save the page to finalize deletion of the attachment.
Insert tables
The Insert Table button on the Page Designer toolbar launches a dialog in which you can specify the basic properties of the new table such as number of rows and columns, width, alignments, border, and header. Tables can be inserted into any region of a Page. Locate the insertion cursor in the region at the point where you want to insert a table, and then invoke Insert Table.
After a table has been inserted, whenever your cursor is in a table cell, the Table menu is available on the Page Designer toolbar. It contains a number of items that enable you to modify the table. You can:
Insert new rows and columns.
Move columns and rows.
Delete rows, columns, or the entire table.
Set the text alignment for the table.
View and modify the table properties.
If you split a region that contains tables, the tables will be automatically resized. You may want to review them and make adjustments such as resizing the columns. You can resize columns by dragging a vertical border to the left or right.
Insert links
Your can insert text hyperlinks into any region of a Page. The Insert Link button on the Page Designer toolbar launches a dialog in which you can specify the target URL, and optionally the link text of the hyperlink. If you don't change the Label field, the URL appears as the link text.
Three types of links are recognized:
Links to Polarion items (represented by the item type icon and its ID/Title).
Internal portal links, represented by internal URL link text.
External links, represented as external URL link text.
Place the insertion cursor at the point in the region where you want to create a link, and click Insert Link.
You can also create a link by pasting a URL into the Page text. Be sure to leave a space before and after the URL, otherwise it is not recognized as a link. The link text will include all characters in the URL. After a link is created, the link itself can be copied and pasted. A pasted link is processed and recognized according whether it is a link to a Polarion item, an internal portal link, or an external link.
Insert table of contents
You can insert a automated table of contents into a Page. Although it is possible to insert this into any place in any region of a Page, the most common practice is to insert it at the beginning of the topmost region. A Page only accepts one table of contents. If you try to insert another one, you see an error message.
Table of contents entries do not appear in the Page Designer, even after you save changes. They are generated only after closing the designer and returning to view mode. If the Page does not contain any Table of contents elements, a message to that affect appears when the page is viewed. The TOC cannot be copied/pasted.
You can delete the Table of contents from a Page by clicking on it in the Page Designer, and pressing your keyboard's Delete key.
Insert a Widget
Users of a Polarion Pro license cannot insert Widgets.
Widgets retrieve and format project data from your Polarion portal for reporting purposes. Normally, you use them only in LiveReport type pages, but it is possible to use them in any page of either type. If you decide you want to show some chart on project Work Items in an Info Pages, you can.
The Widgets sidebar is shown by default when you are editing any Page, and you can optionally insert Widgets into any region. The distinction between Info and LiveReport pages is made purely to generalize different use cases. The page types use different layout templates but are otherwise the same.
See Insert a Widget for details.