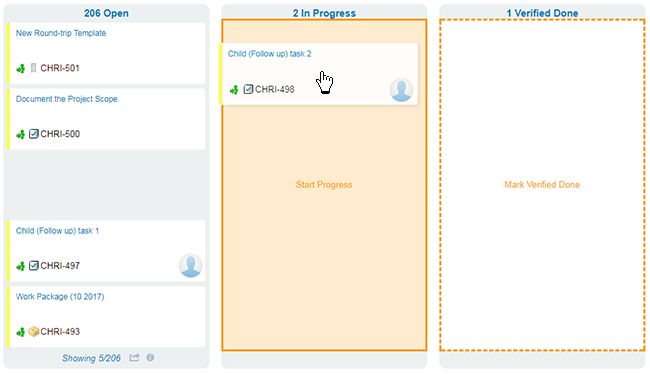
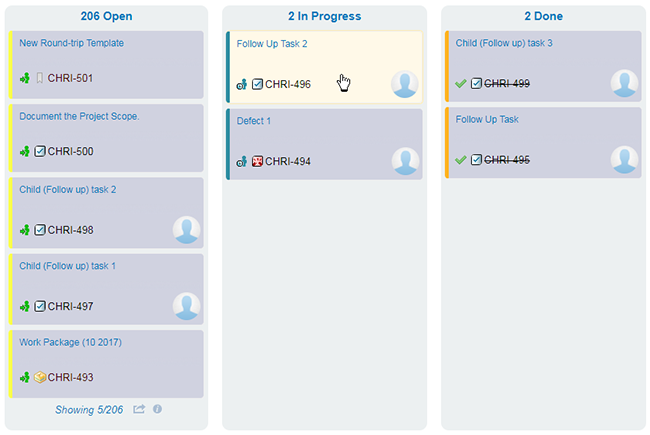
Kanban board
You can create a drag and drop Kanban style board for Work Items on  LiveReport, Info Pages and
  Plans. The number of columns (workflow states), the type of Work Items to include, and the board's appearance are all defined in the Kanban Board: Parameters sidebar.
The properties of a Swimlane (parent Work Items) and their children (Cards) can be viewed and modified by clicking on their whitespace.
Add a Kanban board
Select a
LiveReport, Info Page, or a Plan and launch the  Widgets sidebar.
For a
LiveReport or Info Page:Choose a
LiveReport or Info page from a  Space under the
  Documents & Pages topic.
Click
 at the top of the page.
Click
 Edit.
Edit.
For a
Plan:Choose a
Plan: from the  Plans topic.
Click
 then
then  Customize Plan Report.
Click in the page box where you want to insert the board.
Select the Work Items or Planning tab under the
Widgets sidebar.Click on the Kanban Board icon. The Kanban Board: Parameters sidebar opens on the right.

In the Scope field, select a
 Project,
  Project Group, or the whole
  Repository.
Select a Query Type. (If you are unsure what kind of query type to use, just leave it on Lucene. You will be able to build a query graphically in the steps that follow.)
Select a Work Item Type.
To add a single Work Item type to the board, you can select it from the Type drop-down list.
To select more than one Work Item type, leave the default
 Work Item selected.
Use the Query field to define the Work Items you want added to your Kanban board.
If you're familiar with Polarion's advanced command-line query syntax, you can paste your query directly into the field.
Click
 to define what items to include graphically.
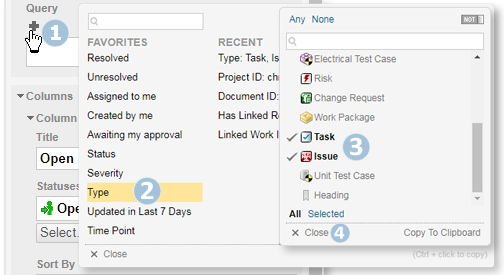
Click a set of options to include and click
 . ( Click multiple times to add additional criteria.)
In large projects, you can combine the command-line and graphical query options to really fine-tune your selection.
Add a Title for the first status, for example Open, in the Columns section.
Click
 , choose a status item from the Available Items on the left, and click
  . (You can add more than one.)
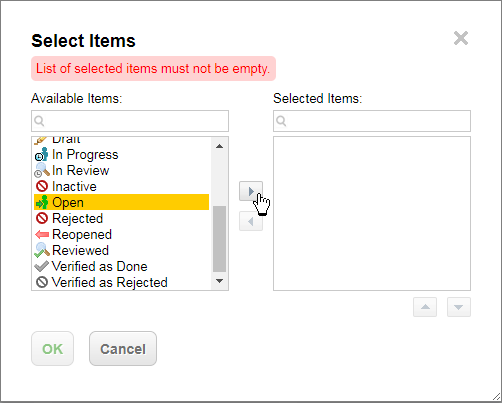
Click OK.
(Optional) Click
under Sort By, and select how the Work Items are sorted and the direction that they should be sorted in.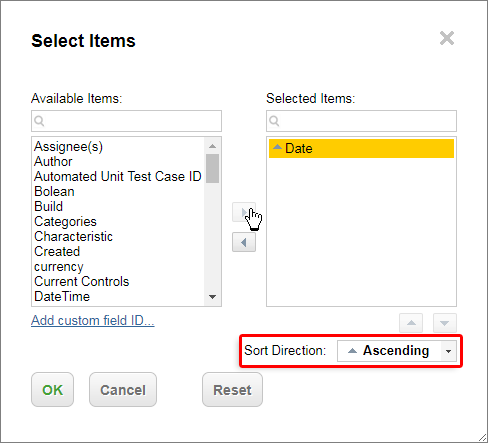
Click OK.
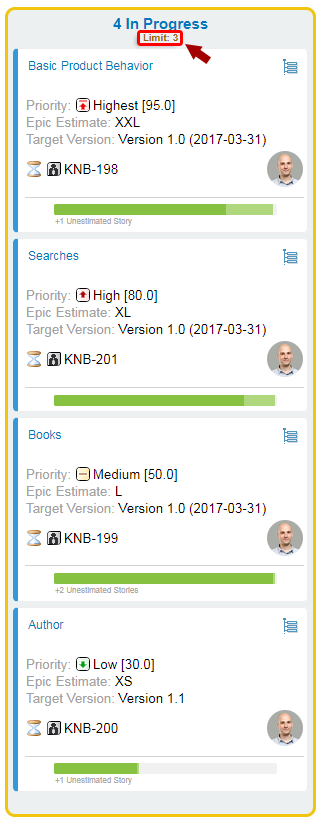
(Optional) You can set a Limit on the number of items that appear in the column. The Limit appears at the top of the column and if it is exceeded, the column is highlighted with a yellow border.
(The default setting of 0 disables this feature.)
Click Add Column
 and repeat steps 10 through 14 for each workflow status.
(Optional) Click on a card to launch Work Item Properties Sidebar and add fields that you want to appear.
As a report editor: (Edit mode):
Click
under Work Item Properties Sidebar Fields to add any fields that you want to appear under the Work Item Properties Sidebar. (Launched when a Kanban, Table or Work Items Board widget item is clicked.)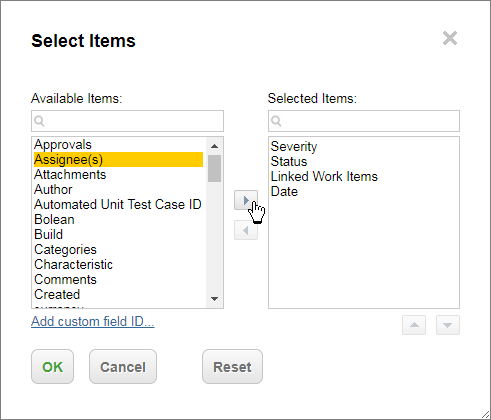
Select a field on the left, click
, and click OK when you've finished adding the fields you want to include.Click a card and the selected fields appear in the Work Item Properties Sidebar.
As a user:
Anyone who clicks on an item in a widget that supports the Work Item Properties Sidebar.
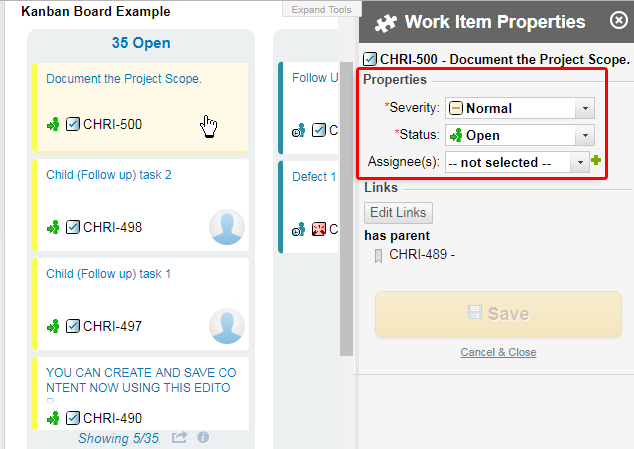
Click on a Card, Swimlane, or table item.
The Work Item Properties Sidebar appears on the right.
Click the
 icon on the top right and click Select Fields.
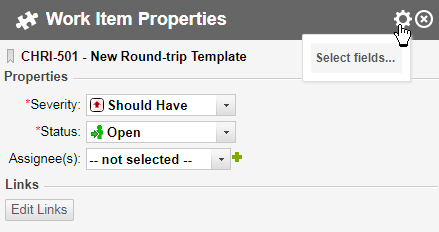
The Select Fields dialog appears.
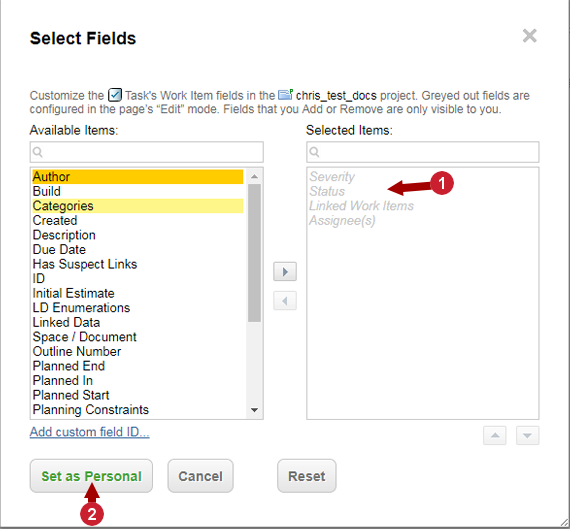
 Selected items can only be added or removed when the report is in Edit mode.
 The selected fields will be your personal, default fields for all widgets that support the Work Items Properties sidebar with the currently selectedProject.
Select a field on the left, click
, and then click Set as Personal when you've finished adding the fields you want to include.Note:Work Item Properties Sidebar fields:
Grayed out fields can only be removed when the report is in Edit mode
The fields will appear in the Work Item Properties Sidebar for all Kanban, Table and Work Items Board widgets.
Fields added by a user (when not in Edit mode), will only be visible to them.
Add fields in Edit mode above if you'd like other users to also view them by default.
The added fields will only appear for the selected Work Item type (


 ) and Project.
The fields will be added to the Work Item Properties Sidebar of all the Kanban, Table and Work Items Board widgets in the selected
project.
Click Apply or follow the instructions in the following Customize the Kanban Board's Appearance section to change the board's appearance.
Customize a Kanban board's appearance
You can customize the appearance of the cards by adding custom velocity snippets. You can change the color of the card, remove the status border color, show different Work Item fields, re-arrange the fields already rendered, and more. The custom Velocity scripts will be rendered instead of the default java scripts. Default velocity snippets are included with the widget under the Board Script and Card Script parameters and are a great starting point. The sample scripts mimic the java rendered output that's provided out of the box.
Click
 in the header of an inserted Kanban board.
 The Kanban Board: Parameters sidebar appears on the right.
Set the Enable Customization widget parameter to Yes.
The Board Script and Card Script parameters appear below.
(You can always revert to using the internal Java rendering by setting Enable Customization back to No.)
Customization options:
Board Script: Insert at the beginning of the board. Always use to add custom CSS styles and/or JavaScript common for all your cards. This avoids needing to duplicate the scripts for each card.
Caution:The styles inserted in this script are applied to the whole page.
Card Script: Defines the content that appears within the cards.
The Card Script Velocity script allows for the following additional objects:
$workItem: The Work Item rendered in the card.
$columnIndex: The column that the card is rendered on.
Tip:The Work Item Properties sidebar and the ability to drag and drop are still available when customizations are enabled.
Change the Card color
Open a Page that contains a Kanban board in Edit mode.
Click
 on the top right of the board in Edit mode to open the Kanban Board: Parameters sidebar.
Click Advanced.
Define The maximum # of results per columns that appear.
Click the Showing #/# link on the bottom of a column to see the next list of items.
Click Yes to Enable Customization.
Click on Board Script. (For a full screen view of the script press F11 and Esc to exit full screen view.)
Change the background color of the card by adding background-color: #d0d2e0; to .kanbanWorkItemDiv.
(#d0d2e0 can be replaced with any color you'd like.)
Change the gradient of a long title by changing the background property in .kanbanWorkItemTitleGradientDiv to,
background: linear-gradient(to bottom, rgba(255, 255, 255, 0), #ccffff) repeat scroll 0 0 rgba(0, 0, 0, 0);
Enable the Work Item Properties Sidebar by adding:
.polarion-sidebar-highlight .kanbanWorkItemDiv {
      background-color: #fff9e8;
      }
The entire Board Script would look like the following:
kanbanWorkItemDiv {
  padding: 7px 3px 3px 7px;
  box-sizing: border-box;
  border-left: 5px solid;
  border-right: 1px solid #EEEEEE;
  border-top: 1px solid #EEEEEE;
  border-bottom: 1px solid #EEEEEE;
  border-radius: 5px;
  position: relative;
  background-color: #d0d2e0;
}
...
.kanbanWorkItemTitleGradientDiv {
  bottom: 0px;
  height: 12px;
  left: 0;
  position: absolute;
  width: 100%;
  display: inline-block;
  background: linear-gradient(to bottom, rgba(255, 255, 255, 0), #d0d2e0) repeat scroll 0 0 rgba(0, 0, 0, 0);
  filter: progid:DXImageTransform.Microsoft.gradient
(startColorstr='#00FFFFFF', endColorstr='#FFFFFFFF', GradientType=0);
 }
...

.polarion-sidebar-highlight .kanbanWorkItemDiv {
    background-color: #fff9e8;
}

...
Click Apply.
The example script above changes the Kanban board's appearance:
(No changes are required to the default Card Script.)
Page Parameters: Add a Work Item's  Tree Structure link
You can customize what content appears within the cards in Card Script.
Open a Page that contains a Kanban board in Edit mode.
Click
on the top right of the board in Edit mode to open the Kanban Board: Parameters sidebar.Click Advanced.
Click on Card Script. (For a full screen view of the script press F11 and Esc to exit full screen view.)
Paste the table text below between the <div class="kanbanWorkItemDiv" style="border-left-color: $wiStatusColor;"> and <table class="kanbanWorkItemTable"> tags.
<table width="100%">
 <tbody>
 <tr>
 <td class="kanbanWorkItemTitleDiv">
 <div class="kanbanWorkItemTitleGradientDiv"></div>
 <a href="$wiLink" target="_top">$workItem.fields().title().render()</a>
 </td>
 #set($treeLink =$transaction.context().createPortalLink().project("$wiProjectId").workItems().query("id:$workItem.getReference().id()").toEncodedRelativeUrl())
 #set($suffix = '&tree_depth=2&tab=tree')
 <td style="vertical-align: top;">
 <a href="$treeLink$suffix" target="_blank">
 <img style="float: right;" title="View Item in a Tree Structure" src="/polarion/ria/images/details/treetable.gif"/>
 </a>
 </td>
 </tr>
 </tbody>
</table>
Click Apply.
A tree icon with a link to the card's Work Item in
Tree view is added to the card.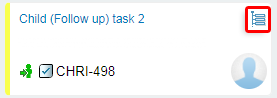
Revert customization changes
The Work Item Properties sidebar and the ability to drag and drop are still available when customizations are enabled, and you can always revert to the internal Java rendering by setting Enable Customization to No.
Kanban FAQ
Q: How do I get the ID of the current project?
A: In Velocity: $page.reference.projectId
Q: What to do when HTML table exported to PDF loses styles and/or there are no columns?
A: PDF export requires that HTML tags <tr>, <th> and <td> are closed with </tr>, </th> and </td>.