Import from Excel
Microsoft Excel workbooks containing artifacts such as requirements, test cases and defects can be imported to Polarion to create tracked and managed Work Items of the respective type. During import you have the option to create Work Items in a Document or as items in the project's tracker. After import into a Document, you have the option to use Word Round-trip to collaborate with external stakeholders who use Microsoft Word. After import to the tracker, you have the option to use Excel Round-trip to collaborate with external stakeholders who use Excel.
Preparing to Import
Before beginning the import from Excel process, there are several things you should do or check:
Check the configuration of the project into which you will import. Verify that the Work Item type corresponds to the type of artifact you are importing. If necessary, customize the configuration to define a corresponding Work Item type. For example, if the Excel document contains test cases, the target project's configuration should define a Work Item type corresponding to test cases.
Work Item types are defined in
 Administration: Work Items: Types. If you don't have access to Administration, you can see the currently configured types by opening the project and expanding the
  Work Items node in Navigation.
Familiarize yourself with the data fields of the Work Item type you are importing, including any custom fields that may be configured for project Work Items and for the type of Work Item you import. Look at an existing item of the type, or if none exist yet, create a new one in the Table view of the Work Items topic. Review the fields, but don't save the new item.
Review the Excel worksheet containing the artifacts you are importing. Rows should correspond to individual Work Items. For example, if the sheet defines requirements, each requirement should occupy one row. (The worksheet can contain a header row.) Columns should correspond to Polarion Work Item fields. Import of multivalued data is supported for some Polarion multivalued fields.
See Import from Excel:Multivalued Data and Fields for more information.
Decide which Excel columns should map to which Polarion Work Item fields. If some columns have no corresponding Work Item fields and you want to store their data in Polarion, it is necessary for a Polarion or project administrator to add custom fields to the project configuration before importing. You are able to specify field mapping during the import process. For information on which Work Item fields are supported for Excel import, see Import from Excel: Supported Work Item Fields.
Identify the cell at which the import process should begin. You need to specify it in the import wizard. Normally this is the leftmost cell on the first row after the header row, if a header row exists. However, it can be any cell. For example, if you have previously imported artifacts from a worksheet, and new ones have been added which you now want to import, you will need to specify the first cell on the first row containing the added items.
Check that images to be imported from the worksheet are in .gif, .png, .bmp, or .jpg format if you want them to appear inline with other content. Images in other formats (.tiff for example) may still import, but will be attachments (rather than appearing inline) and they will not appear in the import preview.
Create Work Items with links to Work Items from another Polarion Project before importing. See Linking Work Items Across Projects for details.
Import a Document
If your team prefers a document-centered approach to artifact management, you can import artifacts from Excel and store them in a LiveDoc Document. This is the preferred approach if you subsequently need to collaborate on artifact content with external stakeholders who use Microsoft Word. Your team will be able to use the Word Round-trip feature.
Import Work Items from Excel into a Polarion Document:
Open the project into which you want to import Work Items and in Navigation, select
Work Items.In the
 Table view, click
  and choose Import to launch the Import Work Items dialog box.
In the Format field of the dialog box, select xlsx: Microsoft Excel Workbook.
In the Configuration field, optionally select an import configuration. (Import configurations contain rules that govern how artifacts are imported and mapped.)
In the File field, specify the locally stored Excel worksheet file you want to import and click Start. The first page of the Import Excel Workbook wizard appears.
In the Import rows from sheet field, select the worksheet that contains the artifacts you want to import in this operation. The list shows all worksheets in the specified workbook. You can only import one worksheet at a time. For example, if a workbook contains requirements in one sheet and test cases in a different sheet, you must do a separate import operation for each type.
In the Begin import at cell field, specify the cell at which the importer should begin importing artifact data. The importer examines the worksheet and suggests a cell. The cell you specify in this field should not be part of a header row. If the first column is some kind of artifact identifier, you can begin importing from the second column, as Polarion assigns its own IDs to Work Items created during the import process (see figure below).
Review the Table contains header field. The importer examines the worksheet and checks this field if the sheet appears to contain a header row. (See figure below for an example of a header row.)
Click the as new Document link to indicate that Work Items should be imported into a new Document. Two editing fields appear.
In the drop-down list control, select the space where Polarion should create the new Document, and then enter a name for the new Document in the field provided. Note that the Document name must be unique within the specified space. If your project is configured to support Document Types, specify which type the new Document will be.
Click Next when you are ready to continue. The field mapping page of the import wizard appears.
Map the worksheet columns to appropriate Work Item data fields. Use the Preview button to check the import result, modify mapping, create more import rules as needed, and optionally saving the rules you define for reuse with subsequent Excel imports.
Use the Preview button to preview how the Work Items looks in the Document after importing.
Click Import to import the Excel artifacts and create Polarion Work Items in the specified space and Document.
Import to the Tracker
If your team prefers a tool-based approach to artifact management, you can import artifacts into Polarion storing them in the integrated tracker rather than in a Document.
Import Work Items from Excel into the tracker:
Open the target project and in Navigation, select Work Items. The Table view appears.
In the
Table view, on the toolbar, click and choose Import to open the Import Work Items dialog box.In the Format field of the dialog box, select xlsx: Microsoft Excel Workbook.
In the Configuration field, optionally select an import configuration. (Import configurations contain rules that govern how artifacts are imported and mapped.)
In the File field, specify the locally stored Excel worksheet file you want to import and click Start. The first page of the Import Excel Workbook wizard appears.
In the Import rows from sheet field, select the worksheet that contains the artifacts you want to import in this operation. The list shows all worksheets in the specified workbook. You can only import one worksheet at a time. For example, if a workbook contains requirements in one sheet and test cases in a different sheet, you must do a separate import operation for each type.
In the Begin import at cell field, specify the cell at which the importer should begin importing artifact data. The importer examines the worksheet and suggests a cell. The cell you specify in this field should not be part of a header row. If the first column is some kind of artifact identifier, you can begin importing from the second column, as Polarion assigns its own IDs to Work Items created during the import process.
Review the Table contains header field. The importer examines the worksheet and checks this field if the sheet appears to contain a header row.
Click Next when you are ready to continue. The field mapping page of the import wizard appears.
Map the worksheet columns to appropriate Work Item data fields. Use Preview to check the import result, and modify mapping, create more import rules as needed, and optionally save the rules you define for reuse with subsequent Excel imports.
Click the Import button to import the Excel artifacts and create Polarion Work Items in the project tracker.
Field mapping and import rules
Before importing, link Work Items across projects to create Work Items with links to Work Items from another Polarion project.
After you specify the scope of the data to import, the second page of the import wizard presents an interface enabling you to:
Map columns in the worksheet to Work Item fields.
Specify one or more conditional rules that control how the data is imported.
Reuse a previously saved import configuration that is, a combination of field mapping and conditional rules.
Preview the result of the import with the current mapping and import rules.
Save the current field mapping and rules as a reusable import configuration.
Import the worksheet data and create Work Items from worksheet artifacts.
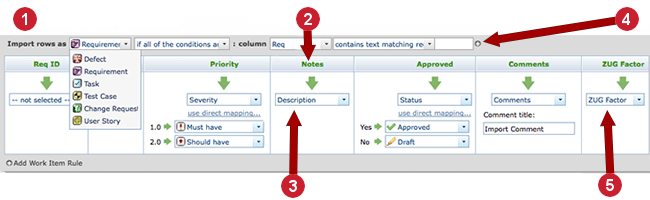
The page initially presents a new import rule with field mapping:
|
|
|
|
|
 Work Item import rule
 Conditional rule
 Excel column
 Custom field
 Work Item field
Start by specifying what type of artifact you are importing from the Excel worksheet. Select from the list of currently configured Work Item types. Next, specify the condition(s) for importing data as the selected type. You can add more conditions by clicking the  icon.
icon.
Next, specify how Excel columns should be mapped to Work Item fields. Proceed from left to right. Column headers are worksheet column names. Cells contain drop-down lists from which you can select a field name. It is not required to specify a field for every column. For example, if the worksheet contains a column with some sort of ID for an artifact, you can skip mapping it because Polarion assigns IDs to all Work Items created by the importer.
When you select some fields, they dynamically display fields for mapping date values in the worksheet to Work Item field values. For example, suppose your Excel sheet has a column Priority with numeric values, 1, 2, or 3 which actually corresponds to your Polarion project's Severity field, configured with values Must have, Should have, Nice to have. When you select Severity in the Priority column, the importer detects the data values in the worksheet and presents a drop-down list for each value in which you can specify the corresponding Severity field value.
In many cases, a single import rule gives the desired import result. (Remember that you can use the Preview button at any time to preview the result of the import without actually importing. Preview shows only the first 100 matching items found in the sheet.) If a single rule is not robust enough for your needs, you can add more rules. To begin, click the icon labeled Add Work Item Rule. Another set of condition rule plus field mapping is added to the page. Use it to add more parameters to the import configuration.
After Preview shows the import result you want, but before you click Import to trigger the import, consider whether you or other team members might need to import another Excel worksheet using the same rules and mappings you currently have specified. If so, click the gear icon in the header, choose Save, and specify the name and scope of the import configuration.
Create and reuse import configurations
An "Import Configuration" is a saved import rule or set of import rules. Import Configurations can save significant time and effort when there is a need to import multiple similar Excel worksheets. Import Configurations can be saved in the global scope to make them available across projects, or in the project scope to confine their availability to a single relevant project.
Create a new Import Configuration:
Begin importing an Excel workbook.
Define the import rule(s) for an imported worksheet, using preview to verify the import result.
When you have the result you want in the preview, but before you click Import, click the drop-down icon (next to the workbook file name on page 2 of the wizard), and choose Save on the menu. This launches the Save Import Configuration dialog box with the Create new configuration option selected by default.
In the Scope field, specify the scope of the new Import Configuration (Global or Project).
In the Name field, specify a meaningful name for the new Import Configuration. This name will appear to users in the specified scope in the Configuration field when they import Excel workbooks.
Click Save to create the Import Configuration.
Reuse an existing Import Configuration:
Begin importing an Excel workbook.
In the Import Work Items dialog box, in the Configuration field, select the Import Configuration to use for the current workbook import.
Select the Excel file to import and click Start.
You can modify the import rules loaded from the saved Import Configuration. You can optionally save the modified import rule as a new Import Configuration, or you can overwrite the existing Import Configuration with your changes (select the Update existing configuration option in the Save Import Configuration dialog).
See Remove Unused Excel Import Configurations for more information.