Author work instructions
If you have not done so already, open an existing work package, or create a package and browse to the process or operation for which you want to author instructions.
Click the Work Instructions tab and populate the Viewer panel as described in Interact with the Work Instructions tab and panels.
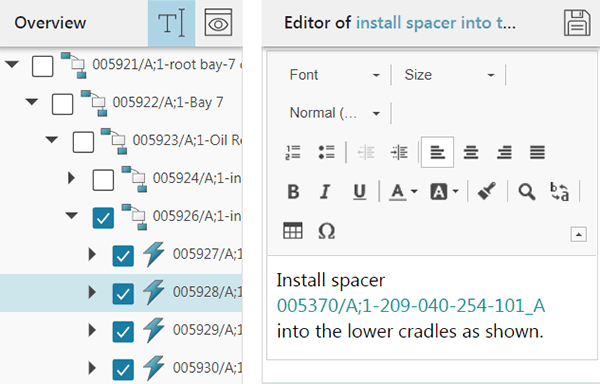
The Overview panel of the Work Instructions tab displays the contents of the process: child operations and processes. It also shows consumed parts and assigned resources.
The Editor panel is populated with work instructions for the loaded process and its process planning objects: child operations and processes. It displays the name of the process or operation before each work instruction section, as well as highlighted gray authoring tips if no work instructions exist yet. It is possible to scroll down through the children in the Editor panel.
Note:If you edit a section to add additional instructions to a process or operation, the scroll area also increases.
Write the work instructions for the selected process or operation.
Using the tools in the Editor panel, you can:
Specify the font, font size, and paragraph format of your text (default = Normal).
Create numbered steps or bulleted lists, indent or outdent paragraphs, and specify text alignment.
Boldface, italicize, underline, and change the color of text as well as the background color, copy text formatting, and add special characters.
Find and replace text with matching text, including whole words and cyclic patterns of text, except in text created using the [[ and {{ characters (see tip below).
Create tables into which you can insert text and symbols.
Add symbols to indicate work situations such as prerequisites, safety precautions, or dangerous materials.
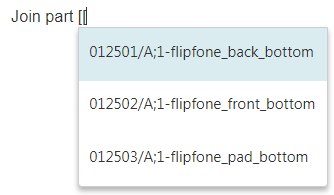
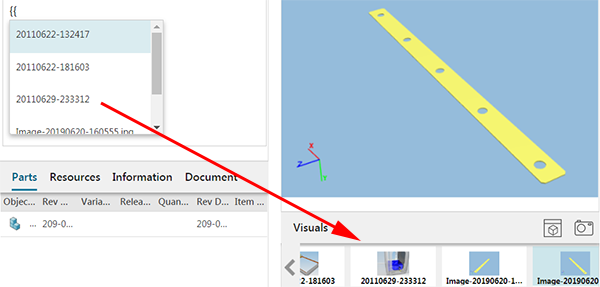
When using [[, {{, and \\:
If you type [[, the Editor panel displays a list of parts and resources assigned to the selected process or operation:
If you type {{, the panel displays a list of visuals assigned to the selected process or operation:
 Note:
Note:Manually typing part, resource, and visual names or IDs can lead to mistakes. Use the [[ and {{ characters to reduce such mistakes.
When you select the part, resource, or visual, the part or resource name is displayed and the [[ or {{ characters are removed from the text. When you specify a visual, the text "as seen in:" precedes the visual name.
Once you insert a part, resource, and visual name, you cannot edit it. To delete a name, place your cursor after the name and press the Back key.
Tip:Press the down arrow to select the preferred part, resource, or type part of the name or ID to filter the list until a unique selection is displayed, and then press Enter.
If you type \\ and a * icon, the panel displays a list of standard work instructions from Manufacturing Process Planner that you can apply to the selected process or operation. You can also enter text to refine the results.
Note:You cannot edit standard work instructions. Standard text is intended to be applied when you have commonly repeated instructions and do not want to retype them each time they are required. You can click and move or delete the results as necessary.
Work Instructions Authoring can automatically read textual work instructions created in Manufacturing Process Planner for processes or instructions and convert it to HTML in Easy Plan with no conversion necessary as long as it is not used in Easy Plan. When you save the work instructions, HTML based work instructions are attached to the operation/process and saved to Teamcenter, textual instructions are not touched. The automatic conversion is text only; images and text styles are not retained. Unlike standard work instructions, you can edit textual work instructions.
(Optional) Add symbols to indicate work situations such as prerequisites to an activity, safety precautions, or dangerous materials by doing the following.
Note:Due to compatibility issues with Active Workspace, Work Instructions Authoring 2.9 can only display symbols in Electronic Work Instructions 4.2.3 or greater.
Click Insert Symbol , and navigate to the symbol you want to add to the note.
In the File Upload dialog box, navigate to the symbol file you want to upload, select the file, and then click Open.
The image appears in the work instruction.
Note:Symbol file height cannot be greater than 132 pixels. If you add a higher-resolution image, Work Instructions Authoring resizes both the height and the width of the image.
To delete a symbol, select it and then press Delete.
Click Save .
Note:If you save a new or update an existing work instruction for an object with a status of Released, Easy Plan will suggest that a new item revision be created. If you accept, Easy Plan will create a new revision and save the work instruction. If you cancel, no new revision will be created and the changes to the work instruction will be discarded.
You can use the Information tab to review or to edit properties.
Review information such as revision name and description, or allocated and estimated time.
To edit, click Start Edit, modify the details, and click Save or Cancel Edit.
Note:In order to change the list of properties in the information tab, an administrator must update a style sheet per object type. For example, update the following:
For operations, the style sheet of the Mbc0Mfg0BvrOperationSummary data set.
For processes, the style sheet of the Mbc0Mfg0BvrProcessSummary data set.
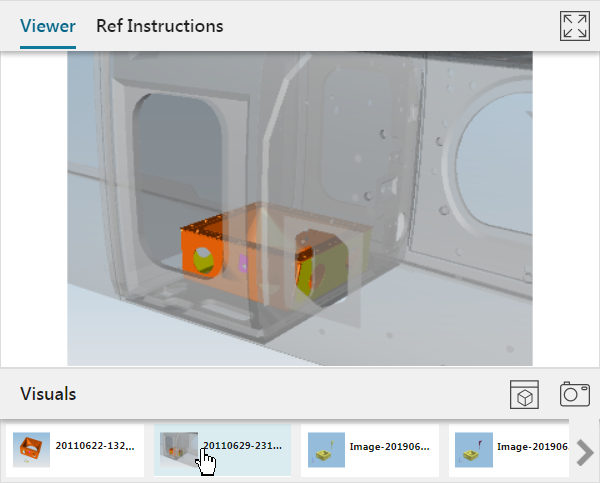
(Optional) Select an object in the process structure, and click
 in the Viewer panel.
Work Instructions Authoring reports that a 2D capture of the Viewer panel is attached to the selected process or operation. The capture appears as an attached .jpg image in the Information tab and a thumbnail is added to the Visuals panel.
(Optional) To switch back into editor mode, click
 .
.