Configure user permissions
Permissions are an important security issue. You should plan to spend some time with this topic so that you can be sure to configure permissions appropriately.
Permissions can be configured globally for each repository, and for each project. Projects inherit permissions from the repository scope, and changes to the project settings override the same settings in the repository scope.
Permissions are tied to roles rather than to users. Users are assigned one or more roles and these govern what they have permission to access and do.
You should configure roles before you configure permissions
Granting permissions for Polarion does not automatically grant repository permissions. Permission to create projects, edit projects or modify administration in Polarion does not open the required repository access for those actions. You need to make sure your Subversion access permissions are configured so that Polarion permissions do not conflict with repository access permissions. For information, see Repository Access Management.
To access the permissions configuration:
Log on with administrator permissions for the scope you want to configure (repository or project).
If you are not in Administration when you log on, enter the Administration interface (via the
 Administration link in the tool view of Navigation).
Open the repository or project you wish to configure (see Access Projects).
In Navigation, expand
 User Managementand select Permissions Management. The Permissions Management page loads.
You can configure permissions either by individual permission, or by role. Select the tab for the configuration approach you want to use. More information follows in this topic.
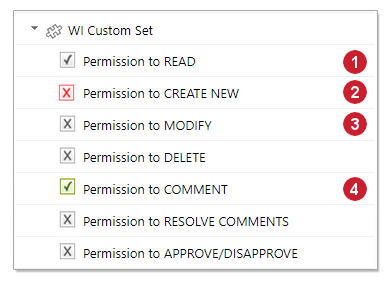
When reviewing and editing permissions, keep in mind the color scheme from the following figure:
|
|
|
|
 Inherited grant (Stronger than Inherited deny)
 Explicit deny (Stronger than Inherited grant)
 Inherited deny
 Explicit grant (Stronger than Explicit deny)
By Permission tab
The By Permission tab enables you to:
View the categories of Permissions, and access individual Permissions within each category. Categories represent areas of the system for which access is controlled by permissions: projects, Documents, or Work Items, for example.
View all of the roles to which a selected Permission is granted.
Grant or revoke the selected Permission from one or more roles.
The top half of the page presents a tree of Permissions, organized into categories. Expand the category nodes to see the individual Permissions. For example, the Work Items category contains Permissions applicable to Work Items — permission to view, permission to modify, etc.
When you select a Permission, the lower half of the page displays the Applicable Roles table. This table lists the roles to which the selected Permission may be granted, and shows which roles have actually been granted the selected Permission with a check mark icon in the Granted column. For example, if you select Permission to READ under Work Items, you can quickly see which roles have been granted this permission.
To grant or revoke permission:
Select the Permission in the By Permissions tree.
In the toolbar of the permissions editor pane (lower half of the page), click the Edit button. The table is now editable.
To grant the selected Permission to a role, select the check box next to the role name in the Granted column.
To revoke the selected permission from a role to which it is currently granted, deselect the check box next to the role name in the Granted column.
Click Save to update permissions, or Cancel to abandon your changes.
By Role tab
The By Role tab enables you to:
Select a role and view the Permissions currently granted to it.
Grant or revoke Permissions for the selected role.
The By Role page presents a tree of Permissions, organized into categories. Expand the category nodes to see the individual Permissions. For example, the Work Items category contains Permissions applicable to Work Items — permission to view, permission to modify, etc. The Permissions show the granted/not granted status for the role currently selected in the Roles list. That list displays the roles configured for the current scope (repository or project) in Administration: User Management: Roles.
To view the Permissions currently granted to a role:
Select the role in the Roles list.
Expand categories to see the Permissions. If the check box for a Permission is selected, that Permission is currently granted for the selected role.
To grant additional Permissions to the selected role, simply select the check box next to any Permission when the desired role is selected in Roles. To revoke a Permission, deselect the applicable check box.
Define permissions for Artifact Sets
You may sometimes need to control permissions explicitly for certain specific artifacts or some attribute thereof, such as fields of Work Items. For example, a project might require explicit permissions control on some specific Work Items or Documents, which is more restrictive than the general permissions for these artifact types. You can accomplish this more granular level of permissions control with the per-dataset permissions management feature, which enables you to create Custom Sets of permissions applied to an explicit set of artifacts.
You can create Custom Sets for:
Work Items
Documents
Pages
Classic Wiki Pages
Plans
Test Runs
Collections
A Custom Set is for one artifact type only. That is, you cannot have a Custom Set that controls permissions for some Classic Wiki pages and some Documents. Each Custom Set controls permissions for a set of artifacts that match a query, which you specify when creating the Custom Set. For example, suppose you have permissions defined for Documents in general, but a project contains some Documents that are of a type named Customer Requirements, and management wants more restricted access for that type than for Documents in general. You can create a Custom Set containing a query that retrieves that type of Documents as a set, and then define permissions for that set. Permissions applied to the set then override the less restrictive permissions on Documents in general.
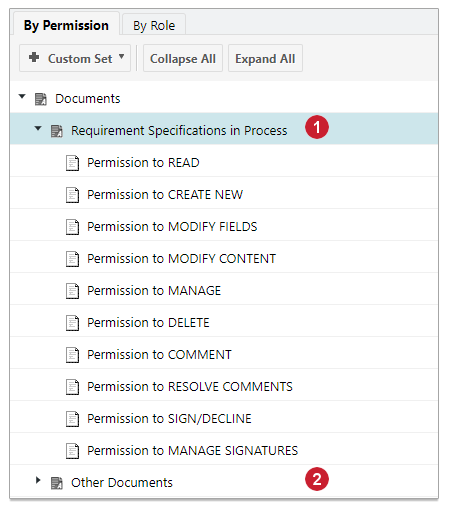
When you create a Custom Set, it appears in the relevant artifact category when you expand it in the permissions editor. For example, if you create a Custom Set for Documents named Customer Requirements Documents, it will appear when you expand the Documents category in either of the tabs. Another entry, Other Documents, is automatically created, which contains the preexisting permissions for Documents.
|
|
Custom sets can be created both in the Global configuration and per Project. Global-level permissions, together with its Custom Sets, are propagated to the Project scope if the Project does not have any Project-scope permissions set. If a Project has at least one change in the permissions (compared to the Global permissions), then newly created Custom Sets in the Global scope do not automatically propagate to the Project.
If you create a new Custom Set in a Project that is inheriting Global permissions that include a Custom Set, then the update saves both Custom Sets — the new set plus a copy of the Global Custom Set.
If a Project inherits a globally-defined Custom set, then changes to it done in the Project scope never propagate to the Global configuration. Instead, a Project-scope configuration is created and used.
If an artifact matches the query in more than one Custom Set in a given scope, then its permissions are controlled by the first Custom Set in the permissions category for its artifact type. For example, if a Document in the Documents category matches the query in Custom Set 1 and Custom Set 3, its permissions are controlled by Custom Set 1.
When querying a Custom Set, it is possible to use query expanders — that is, query elements such as SQL, linkedWorkItems, PLAN, TEST_RECORDS that are decomposed to list of IDs in the background — in queries. When using these, be sure that the user has the necessary permissions for all data accessed by the query. It is also possible to use the variable $[user.id] in a Custom Set query. However, for simple cases of assignee and author, it is recommended to use dynamic roles:
For Work Items - (author and assignee.
For Documents - document_author.
For comments and Document comments - comment_author.
For project - lead.
Follow these steps to create a Custom Set:
Open the project you want to configure and enter
Administration.In Navigation, expand
User Management and select Permissions Management.Select the By Permission tab if it is not the current tab.
Click the Custom Set button, and select an artifact type in the list.
In the Add Work Items Custom Set dialog box, enter a name for the new Custom Set in the Title field. Then enter the Lucene syntax for a query that returns the artifacts to be regulated by this Custom Set (see Query Tip, below).
Click Create to finish the operation and create the new Custom Set.
You can now expand the new Custom Set and set permissions in the same way you set permissions for the artifact type, as described earlier in this topic. Only items that match the query will be affected.
Query Tip You need to be sure the results of the query you enter include all the items that should have their permissions regulated by the Custom Set. One way to ensure this is to go to the Work Items topic in the project and use the Query Builder in the Table view to construct the query. You can browse the results and fine-tune the query as needed. Once you are sure you have the correct set of artifacts, you can click the drop-down icon on the Query Builder and select Convert to Text. You can then copy the text of the query to your clipboard, and paste it to the Query field of your Custom Set.
Queries for permission custom sets:
You can also query for Document, Page, Plan, Test Run types and other attributes in permission custom sets.
Let's say that you want to search for a document so that you can assign permissions to it for external users.
id:DOCNAME1 OR DOCNAME2
If you wanted to refine your search to a particular document type you'd use: type:[document type]
For example:
type:generic
The following parameters also work in a query:
attachments | attachments.author.id |
attachments.author.name | attachments.fileName |
attachments.title | author.id |
author.name | branchedFrom.id |
comments.text | created |
derivedFrom.id | derivedFrom.location |
externalWorkItems | id |
moduleLocation | moduleName |
outlineNumbering | project.id |
space.id | status |
type | updated |
updatedBy.id | updatedBy.name |
Manage Custom Sets:
When you select a Custom Set, its properties are available in the lower pane of the Permissions Management page. Here you can:
Edit the name of the Custom Set.
Modify the query string for the Custom Set.
Move the Custom Set up or down in the list of Custom Sets for the artifact type. This is only available if more than one Custom Set exists for the type. (Position in the list can be important. If an item matches the query of more than one Custom Set, its permissions are controlled by the first Custom Set in the list.)
Delete the current Custom Set. After deletion, the permissions of items revert to the general permissions defined for the artifact type in the relevant scope.
Set permissions for Work Item fields
Administrators can configure the READ and MODIFY permission for most Work Item fields to grant or deny read and/or modify permissions to different user roles. For example, if local laws prohibit employers from revealing how much time an employee has worked to other employees, an administrator can deny read permission for the Time Spent field to appropriate user roles.
Work Item field permissions are located in: Administration: User Management > Permissions Management: Work Items > Fields. As with other permissions, you can access the specific permission via a listing of the permissions (By Permission tab) or by selection of a user role (By Role tab).
Note that denying permission to READ also denies permission to MODIFY. Keep in mind that denying one or both these permissions may impact users' ability to perform such tasks as creating new Work Items, reusing Work Items, and importing Work Items. More information follows in notes for specific permissions.
READ field permission:
When configuring Work Item field permissions, keep in mind the following points:
If fields severity, priority and any other fields required for creating new Work Items are read-denied due to the permissions configuration, then affected users cannot duplicate or move Work Items or reuse Documents containing Work Items.
In the LivePlan, if a user has only items in which permission to READ is denied in one of the fields listed in the plan, then no items for that user appear in the LivePlan.
For import/export and round-trip operations:
The value of READ-denied Work Item fields are not shown in exported files when a user who is denied the permission exports the item(s).
If a user reimporting a round-trip document is denied READ permission for any field(s), the READ-denied fields are ignored by the round-trip importer.
Important: If a user who is denied READ permission for some fields exports Work Items for round-trip, and round-trip re import is subsequently performed by an different user who is not denied READ permission (admin user, for example), then all changed field values in the re imported file are imported and replace the respective current values in the portal.
If any import/export operation cannot be completed because a user is denied some field-level permission to read, the operation fails with a message citing limited permissions as the reason.
For a listing of Work Item fields that have permission to READ, see Fields With READ Permission.
Important permission ramifications
It is important for administrators configuring permissions to understand several ramifications and potential user impacts that may not be readily apparent.
To be able to modify Work Items in a Document, users must be granted:
Permission to MODIFY fields Description and Title.
Permission to MODIFY CONTENT for Documents (including Documents in a Document Custom Set).
By default, users can delete Heading type Work Items without having the permission to DELETE Work Items. To require that permission for deleting Headings, set the system property headingsObeyDeletePermission=true in the system configuration file polarion.properties.
If Test Steps are displayed in a Document and they are not editable, but Title and Description fields are editable, then user can modify Work Items in the Document, but not the Test Steps field.
If a user is denied the permission to READ the Attachments Work Item field, then they also won't be able to view images in the Description and other rich text fields. (All images within a Work Item are considered attachments.).
Permissions for Test Runs
The adding and resolving of comments on Test Runs are controlled by the two permissions: Permission to COMMENT and Permission to RESOLVE COMMENTS. By default, users with a Reviewer, Pro, or Requirements license can add and resolve comments on Test Runs, if their role allows it. If this is not desired, you should explicitly deny these permissions for any roles that you do not wish to allow to have them.
The comment permission is a child of Permission to MODIFY. If you grant that permission to some role that does not currently have it, the Permission to COMMENT is granted as well unless you explicitly deny it.
Permissions for Collections
See Configure Collections for details.