Configure Collections
Here's where you can configure Collections to appear in Navigation, set up Collection permissions, add Custom Fields and allow links that are outside the Collection context.
Add the Collection Topic to Navigation
To get  Collections to appear in Navigation, you have to configure permissions and add the following to your project's Topic configuration.
<topic id="collections"/>
Configure Collection Permissions
A special permission's group is created for Collections.
To create Collections, you must grant both the CREATE NEW and MODIFY permissions.
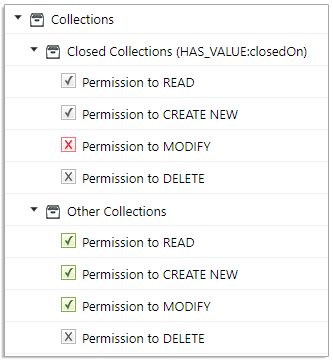
You can also create a Custom Set of permissions for Collections.
In the example above, a user assigned this permission set would not be able to reopen a Closed Collection.
If the
 in the MODIFY permission for say, the project_admin role, was replaced with
  then only project_admin users could reopen a Closed Collection.
For Polarion 20 R1+ installations, the default permissions for Collections are already defined in the permimission.xml file for both demo and non-demo projects.
They are configured as follows:
The admin, project_admin and project_assignable roles have the following permissions:
 READ, MODIFY, CREATE NEW , DELETE.
The project_approver and project_user roles have:
READ, MODIFY, CREATE NEW , DELETE.The user and everyone roles have:
READ, MODIFY, CREATE NEW , DELETE.
When Polarion is updated, all global and project-level Collection permissions must be redefined by admins.
(The admin role is given all Collection permissions by default.)
SVN Permissions:
For new (clean) installations of all demo projects and project templates for Collections.
(.polarion/collection/instances), SVN access is allowed and permissions are granted (if not inherited):
project_admin, project_assignable = rw;
project_user = r
The same goes for new projects created after a Polarion update.
(Only when created based on built-in templates, otherwise see 3.)
For custom project templates, administrators must manually define SVN access for existing projects. It should be set for the folder .polarion/collection/instances, but it doesn't exist until a Collection is created.
Add/Remove Collection Custom Fields
Administrators with the MODIFY permission can add a Custom Fields section with one or more Custom Fields to the Collection detail screen.
Custom fields added on the
 Project level are added to all Collections within the configured Project.
(


 AdministrationCollectionsCollection Custom Fields)
Custom fields added on the Global level are added to all Collections in all
Projects.
Enter
Administration and select CollectionsCollection Custom Fields. (Project-level configuration.)The Collection Custom Fields administration page appears.
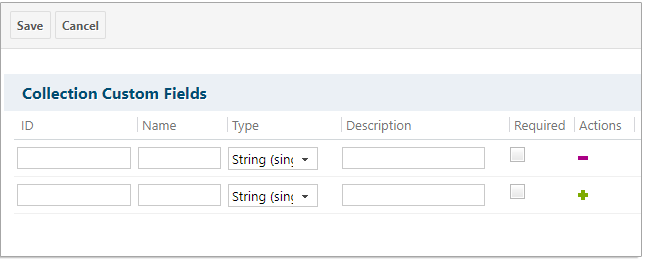
Enter a unique ID and Name.
(The ID can't contain spaces, tabs, linefeeds or the following characters: \/:*?"<>|#';$^`%~!).
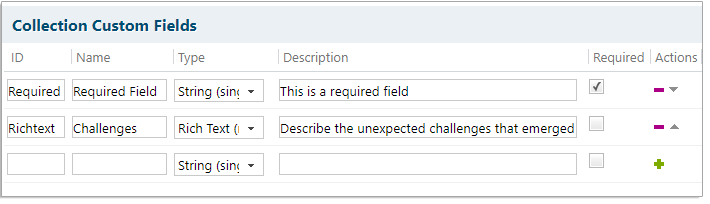
Select a field Type from the drop-down list.
See Custom field types to learn more about the different Types.
Tip:You can make the field
 mandatory by selecting the Required checkbox.
(Optional) Enter a Description. It appears as a tooltip when users hover over the Custom Field's name.
Click
 . (Click
  beside a Custom Field that you'd like to remove.)
Repeat this process for any other Custom Fields that you'd like to add (or remove) and click Save when you're done.
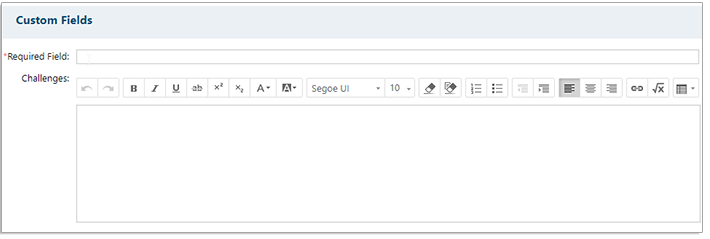
Added Custom Fields appear in a new Custom Field section in all of your Collections.
Make links that lead out of a Collection visible
By default, links that lead outside a Collection are not visible in the Collection context.
(See How links work in Collections for a list of affected links.)
Configure it within Polarion from the configuration
 Configuration Properties.
Configure it via the following system property in the polarion.properties file: