Configure Work Item linking
There are three main configurations that affect the linking of Work Items:
Link Roles and Rules
You can configure link roles that define relationships between linked Work Items of the same type, or different types. For example, a link role depends on can be specified for a link between Work Items to indicate that the current Work Item depends on another Work Item. When you define such a link role, you also define its opposite role. For example, the depends on link role could have an opposite role is depended on by. This link role is seen by users who view the linked item.
Link roles can be configured globally for the repository of any Polarion server, and for individual projects to customize the global configuration to the needs of the project. You can define as many link roles as you need to establish the traceability you require. Project Templates may predefine project-scope link roles.
Each link role definition can have one or more rules, that control which type or types of Work Items can be linked to which other type or types by any given link role. For example, a link role defined as verifies might have a rule that in effect says that the link role can only be applied from a Work Item of type Test Case to a Work Item of type Requirement.
Defining rules for link roles is extremely important because they are reflected in the user interface elements used to create links in Work Items. Link role rules prevent users who may not understand the various link roles, and the directionality of linking, from creating inappropriate links. Such links would result in erroneous traceability data in the system that is then reflected in dashboards and reports.
Access the configuration
Link roles are an enumeration. The configuration settings are stored in the workitem-link-role-enum.xml configuration files. A graphical editor is provided for defining and editing both link roles, and link role rules for each defined link role.
Log on to the portal with administrator permissions for the scope you want to configure.
Enter the Administration interface if you are not already there.
To configure the global scope,select Repository in the Open Project or Project Group dialog box.
To configure a project, select the project to configure in the same dialog box. (See Access Projects.)
In the Navigation pane, expand
 Work Items and select Enumerations. The Enumerations page loads in the Content Pane.
In the Enumerations table, locate the row with workitem-link-role-enum.xml in the Name column.
If configuring the Repository scope, click the Edit link in the Actions column.
If configuring a project, what you click depends on whether or not a project configuration already exists.
If a project configuration does exist, the Edit link appears in the Actions column, and you should click it to access the Enumeration Designer.
If no project configuration exists, the Create link appears in the Actions column, and you should click that to access the Enumeration Designer.
Define Link Roles first
The Enumeration Designer presents two sections: one for the link role definitions (the top section) and one for rules. In the definitions section, you can:
Modify the properties of any existing link role.
Remove any existing link role (click the
 in the Actions column).
Add a new link role (click the
 icon in the Actions column.
ID, Name, and Opposite Name are required. Spaces are allowed.
Do not use spaces in the ID and limit characters to ASCII upper and lower case letters, and numbers, and underscore.
Make sure the value of Opposite Name is meaningful. Look at the default global configuration to see how the concept should work. For example if you were to define a custom link role named amends, a logical opposite name would be is amended by.
Default, if selected, the link role appears first in the list of roles in the Linked Work Items section of the Work Item form.
(If this remains unselected for all roles, then the first role defined appears first in the Linked Work Items section of the Work Item form.)
Define Rules for Link Roles
Define Rules:
The Rules for link role section of the Enumeration Designer is where you define rules for the link roles you have defined. Here you can:
Define new rules.
Modify existing rules.
Delete existing rules.
New and modified rules are not applied to existing links between Work Items. If you had existing links in your system that were created before link role rules were configured, Polarion does not report any errors if any of these preexisting links violate the newer link role rules. The repository may contain links which now violate link role rules.
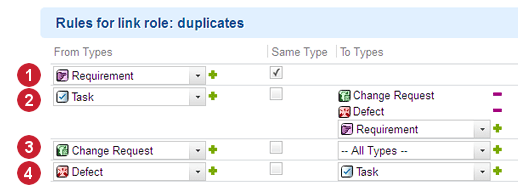
To access the rules for a link role, click anywhere in its row in the top section of the configuration page. The row is highlighted, and any existing rules appear in the rules section below the roles table. Any new rules you define are applied to the selected link role. A single link role can have multiple rules.
A rule says, in essence, that a link using the selected link role is allowed from one or more Work Item types to one or more Work Item types. Accordingly, each rule has a property From Types and To Types. Both are multivalued, since a rule may affect multiple Work Item types. A rule may permit links from a single type to multiple types, from multiple types to a single type, from multiple types to multiple types, or from a single type to the same type only. (The Same Type check box can be used to specify the latter).
|
|
|
|
 One type to same type.
 One type to any other.
 One to multiple specified types.
 One type to one type.
You can create a rule for links that go from a Work Item type in the current project to a Work Item type defined in another project or group. To do that, select other in the To Types field and enter the ID of the Work Item type in the desired project or group. A typical scenario for this is where, for example, a Work Item type named Requirement is defined in the current project, and a type named Test Case is defined in a different project.
Configure Work Item linking menus
The menus are located on the toolbar of the Work Item form in the Work Item Viewer/Editor pane in the Table view of the Work Items topic.
To access the configuration:
Log on with administrator permissions for the scope you want to configure (repository or project).
Open the repository or project you want to configure and enter the
 Administration interface if you are not already in it.
In Navigation, expand
Work Items and select Form Menus. The Form Menus configuration page loads in your browser.
At this point you can create a new configuration for Linked Menus and Linking Menus, or update or delete existing configurations, if any.
When Creating a new configuration, you select the Interface in which the configured menu appears, and the type of Work Item that can have the menu item. Unspecific means the menu item is available for any type.
Menu configuration is done using XML in an online editor. For new configurations, an example is provided in comments. Some help is embedded on the menu configuration pages.
Reference information for this configuration is provided in embedded Quick Help on the administration pages in the portal.
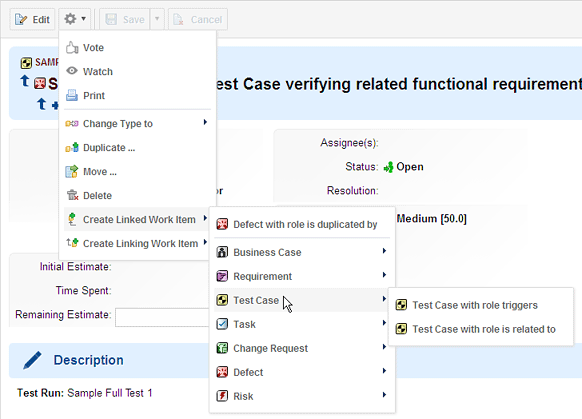
Rules in the Work Item interface
Link role rules control the items reflected in the Action menus in the Work Item detail form. in the Work Items topic. Users creating links to other Work Items can only select valid Work Item types because, thanks to the rule definitions, only types valid for the link role are presented in the menus.
Links using the opposite Link Role
End users can link Work Items with an applicable Link Role or its opposite, so as not to have to switch between different Work Items in order to link with the desired relationship. Backlinks from the same project can be added or removed. When adding backlinks, the Role list shows forward link roles first, followed by appropriately filtered backlink roles from the current project. If the picker dialog box is used, it presets the correct query based on the current project's configuration.
When linking with the opposite role, there are some limitations:
Opposite link can only be created/editing in an individual Work Item (that is, not using Bulk Edit or Multi Edit).
Opposite links cannot be created in the Document Editor. User must open Document-contained items in the Table view of Work Items.
Backlinks from different projects cannot be edited.
Suspect default state
You can configure the default state of the Suspect attribute of Work Items.
This configuration is available for both global (repository) and Project scope. If you are not familiar with the basics of the different scopes, you may want to review the topic The Administration Interface.
To access the configuration option:
Log on with administrator permissions for the scope you want to configure (repository and/or Project).
Enter the Administration interface and open the repository, or the project you want to configure. See Access Projects.
In the Navigation pane, expand the Work Items node and select Linking. The Linking administration page appears.
To have the suspect attribute automatically set to true for all new Work Items, select the Auto Suspect check box. Clear the check box if it is selected, and you do not want new Work Items to automatically have the Suspect attribute automatically set.
Click the Save button to save your change.
Remember that projects inherit the global configuration. If you want to override the global Auto-suspect setting for a project, click the Create button on the Linking page toolbar when you are working in a project, then set the options as you want them for the project. If you want to revert from an existing project configuration back to the global repository configuration, click the Delete button to delete the project-scope configuration.
Links across servers
In a clustered server environment with multiple Polarion servers that host their own Polarion repository, it is possible to link a Work Item hosted on one server's repository to another Work Item hosted on a different server's repository. For more information, see Link to Remote Work Items.