Create and configure a Synchronization Pair
A Synchronization Pair (sometimes called a sync pair in the user interface) defines how a specific type of information is exchanged and synchronized between Polarion and the target third-party system configured in a Connection. In the global configuration, Polarion provides several Synchronization Pair templates that are preconfigured with the commonly required settings to facilitate the configuration of new Synchronization Pairs. You can optionally save Synchronization Pairs that you create and configure in projects, as templates.
The Sync Pair Configuration page provides settings for Polarion and the third-party server connections, data propagation, and data mapping.
Before attempting this configuration, make sure that you have created a Connection to the relevant third-party system
Create a Synchronization Pair
Log on with administrator permissions for the project where you want to define a new Synchronization Pair.
Open the relevant project.
In the
 Tool view of Navigation, click
  Administration.
In Navigation, expand
 Connectors and select Settings.
The Connectors administration page opens.
In the Synchronization Pairs section of the page, click Add Sync Pair in the Actions column.
In the Template field, select the template for the type of synchronization you are creating. The list of templates is filtered according to the setting of the Connect to field, so you may need to set that field in order to select the right template.
Note:If you haven't created a synchronization pair before this, then no templates will be available.
Specify a unique identifier for the new Synchronization Pair in Sync Pair ID. This ID can be specified in Jobs that run this Synchronization Pair. Example: Jira Sync 1
Select a Connection in the Connect to field. The list in this field is populated with the names of all existing Connections.
Click Create to create the Synchronization Pair configuration.
The Sync Pair Configuration page for the new Synchronization Pair loads and displays settings and data mappings.
Other topics in this topic set explain how to work with these settings.
Configure Polarion settings
In the Polarion Configuration section, set the following:
Required. The authentication key from the User Account Vault that contains a user name and password that the Connector can use to access the Polarion server.
You may want to configure a new key specifically for use with Connectors, or even different keys for different Connectors if you connect Polarion to more than one third-party system. For details about Account Vault keys see:Configure the User Accounts Vault.
(The Account Vault configuration requires global administrator permissions.)
Optional, but generally recommended. Enter Lucene query syntax to filter the Work Items that will be synchronized with the third-party system. For example, maybe only Task type items will be synced with JIRA. If that's the case, then you would specify a simple query like type:task. For Task items that are Open or Finished, you would need a more complex query: type:task AND (status:open OR status:done).
Once an item has been synchronized, it will continue to be synchronized until it does not match the query configured for Polarion and the query configured from the third-party system.
Optional. Specified as space name/Document name. If specified, only Work Items from the specified LiveDoc Document in the specified space will be synchronized. The Document's Work Items are filtered according to the filter specified in the Query field, if any.
Optional. Select this option if the title of the Document specified in the Live Document field should be treated as the root element in the synchronization. When selected, the title itself will not be synchronized, but all synced items will have it as an ancestor.
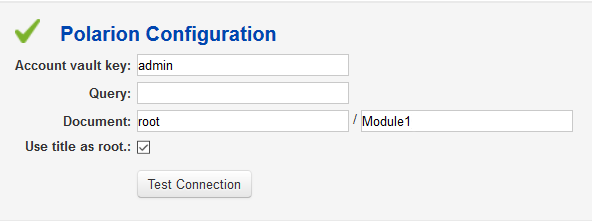
When you've set the desired properties, test the settings using the Test Connection button. A green check mark  appears if the configuration is valid as specified. A descriptive error message appears if a setting is incorrectly configured. This connection, and the one to the third-party system described below must succeed before you can proceed to complete the Synchronization Pair configuration.
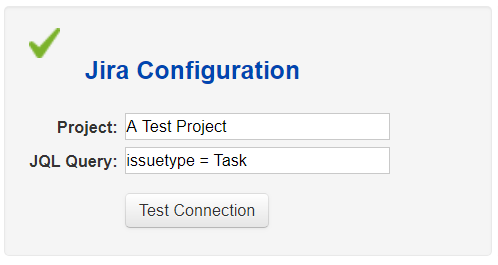
Configure the settings of the connected system
To the right of the Polarion Configuration section there is another section with connection settings for the target third-party system. The fields vary depending on the system, but should be similar enough to Polarion's settings to recognize. (It is expected that you are familiar with the third-party system and understand the fields). Label semantics are taken from the third-party system. After you specify these settings, test the connection with the section's Test Connection button. This connection, and the one to the Polarion server described above, must succeed before you can proceed to complete the Synchronization Pair configuration.
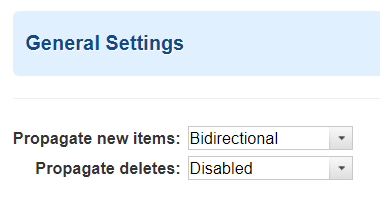
Configure general settings
The General Settings section lets you control the propagation of new items and deleted items between Polarion and the third-party system.
Controls how new items are synchronized.
New items created in Polarion will propagate to the third-party system and vice-versa.
New items of the compatible mapped type(s) created in Polarion will propagate to the third-party system, but new items created there will not propagate to Polarion.
New items created in the third-party system will propagate to Polarion, but new items created in Polarion will not propagate to the third-party system.
Prevents all propagation of new items between the two systems. It is likely to be less commonly used than the other options.
(Only if there's a case where the Synchronization Pair should only be applied to items created before the Sync Pair configuration.)
This setting works much like Disabled except that it controls how deleted items are synchronized.
Once both connections are tested and working, the next step is to map type and field values.