Create and manage User Groups
 User Groups simplify the management of access rights and permissions. Administrators can create personas or Groups with complex permission and role configurations, then easily assign a large number of users to them. Users can be members of multiple Groups simultaneously, so administrators can temporarily elevate a user's credentials by adding them to, for example, a Project-Admin Group. When the task is done that required elevated credentials, the user can quickly be removed and reverted to their previous access level.
The Group administration page
 Global Administration
![]() User Management
User Management![]() Groups
Groups
Only users with the Administration - Modify Configuration permission can access the Groups administration page. They must also have Read/Write access to all Projects. We recommend using the Global Polarion admin role to manage User Groups.
On the | |||
Things to consider when configuring | |||
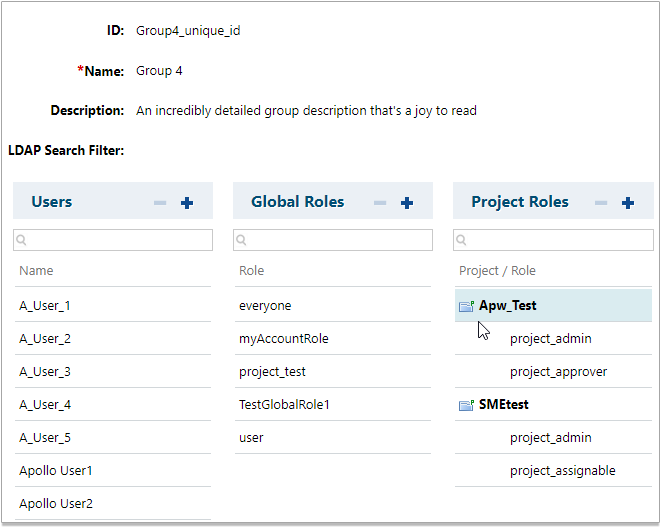
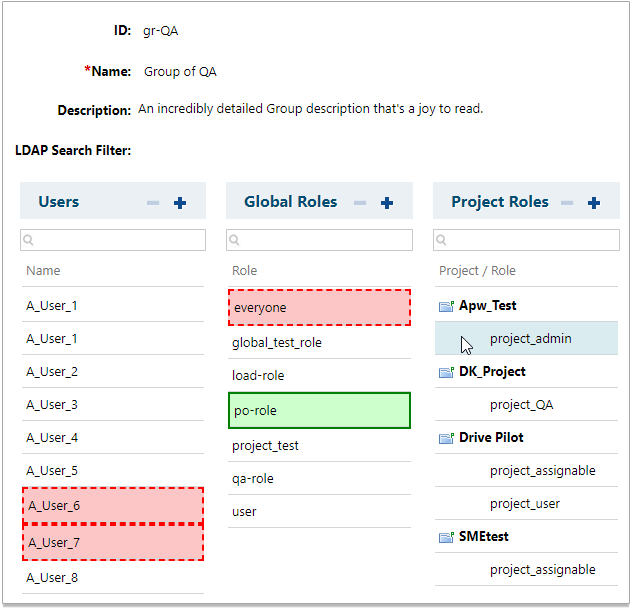
The Group details screen
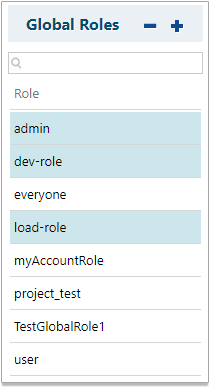
When you select a User Group from the table at the top, its details appear below.
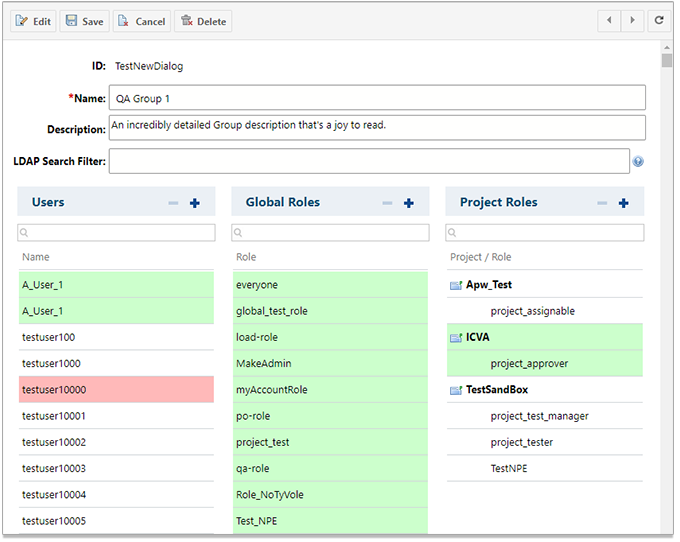
It is possible to add or remove multiple Users, Global Roles, and Project Roles, then
 Save.
Save. Highlighted items are only marked to be added or removed.
(If you close the browser tab, move to another page on the same tab or click
 Cancel before you Save, all changes will be lost.)
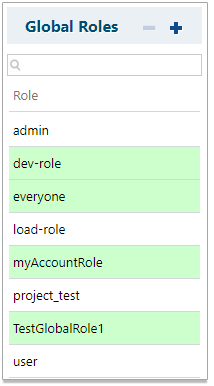
Items marked for addition are highlighted in green.
Items marked for deletion are highlighted in red.
Create a Group
Enter
 Global Administration
 User Management and select Groups.
Click Create new Group on the top left of the screen.
An empty form with ID, Name and Description fields appears under the table.
Enter an ID.
This field must be unique and cannot be renamed once created. (Upper and lower-case letters are treated as the same.)
Supported Characters: (Upper and lower-case letters, numbers, - _ . and @ are allowed.)
Unsupported Characters: !#$%^&*()+',:~[]{}`<=>?\|/'Tab'; Japanese, Chinese and emoticons.
Enter a Name. (Supports all UTF-8 characters.)
Caution:Do not name a
Group using a name that is identical to one already used for a Global Role.(Optional) Enter a Description. (Supports all UTF-8 characters.)
Click
Save. (Or Cancel to exit without saving the new Group.)The newly created Group appears in the table once the page is refreshed.
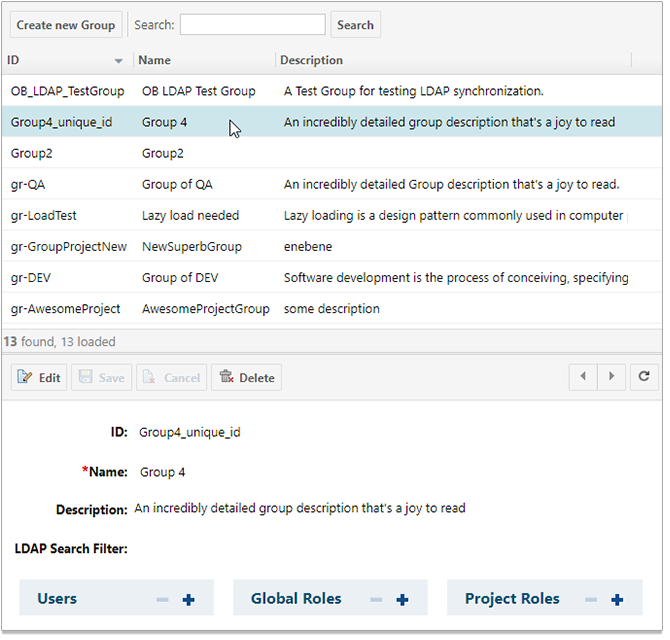
Edit or Delete a Group
Enter
Global Administration User Management and select Groups.Select the Group that you'd like to edit or delete from the table of existing Groups.
The Group's details appear below the table.
 Edit or
  Delete the Group.
Click
Delete. (This will delete Group's folder in the repository.)
Click
Edit or just hover over and click on the Name or Description fields to edit them. (You cannot edit a Group's ID.)
Click
Save when you're done.
Assign users to a Group manually
Enter
Global Administration User Management and select Groups.Select a Group from the table of existing Groups.
The Group's details appear below.
Click
 on the Users column header.
The Add Users dialog box appears.
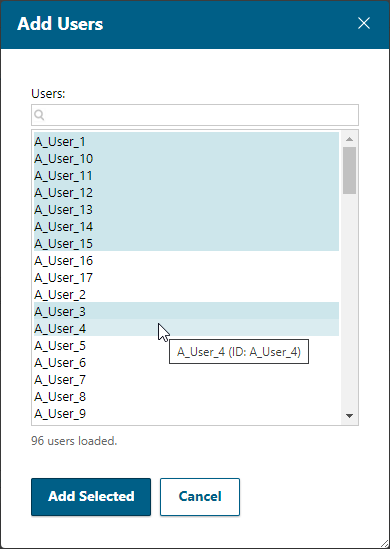
Only users that can be added to the Group (and are not yet assigned to it), appear in the Add Users dialog box.
(The maximum number of Users visible in the dialog box is configurable via a system property.)
Select one or more users.
Hover over a selection to view its ID. (A great way to distinguish between two users with the same name.)
Tip:The Add Users dialog box supports multi-select.
Click Add Selected.
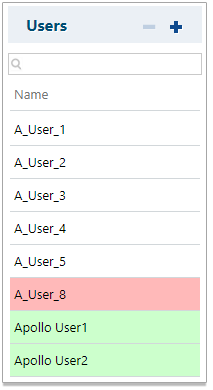
Users marked for
addition are green.Users marked for
 removal, if any, are red.
Note:Highlighted items are only marked to be added or removed. (If you close the browser tab, move to another page on the same tab or click
Cancel before you Save, all changes will be lost.)Click
Save.All changes to the Users, Global Roles and Project Roles columns are saved.
Assign users to a Group automatically via an LDAP synchronization
You can also assign Users to a User Group automatically by synchronizing them with LDAP.
Each User Group can be linked with LDAP via an LDAP Search Filter.
(An optional field found in a Group's details.)
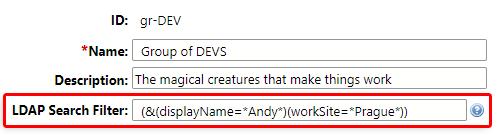
(The LDAP Search Filter above returns users whose displayName attribute contains Andy AND whose workSite attribute contains Prague.)
If LDAP Search Filter is blank, then the Group will not be synchronized with LDAP.
If LDAP Search Filter is not empty, LDAP synchronization will attempt to update the Users of the Group based on the LDAP query entered in this field.
For more information on how to create LDAP Search Filter queries, including examples, see LDAP Search Filter.
Synchronization options:
Manually synchronize User Groups with LDAP.
On the LDAP Configuration page, select the Update User Groups checkbox then click Synchronize to synchronize all User Groups using the defined LDAP Search Filter with LDAP.
Automatically synchronize User Groups via a job.
Schedule one or more jobs to automatically synchronize all User Groups that contain an LDAP Search Filter value to LDAP on a regular basis.
Remove users from a Group
Enter
Global Administration User Management and select Groups.Select a Group from the table of existing Groups.
The Group's details appear below.
Select one or more users.
Tip:These columns support multi-select.
Click
on the User column header or Delete on the keyboard.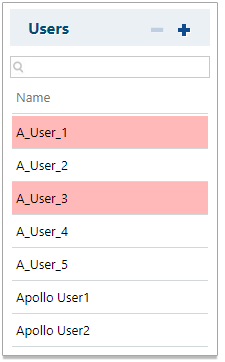
Click
Save.All changes to the Users, Global Roles and Project Roles columns are saved.
Assign Global Roles to a Group
Enter
Global Administration User Management and select Groups.Select a Group from the table of existing Groups.
The Group's details appear below.
Click
on the Global Roles header.The Add Global Roles dialog box appears.
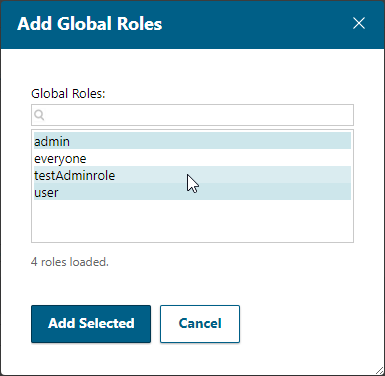
(The maximum number of Global Roles visible in the dialog box is configurable via a system property.)
Select one or more Global Roles.
Tip:This dialog supports multi-select.
Click Add Selected.
Selected roles appear in the Global Roles column highlighted in green.
Click
Save.All changes to the Users, Global Roles and Project Roles columns are saved.
Remove Global Roles from a Group
Enter
Global Administration User Management and select Groups.Select a Group from the table of existing Groups.
The Group's details appear below.
Select one or more Roles. (Hover over a selection to view its ID.)
 Tip:
Tip:This column supports multi-select.
Click
on the Global Roles column header or Delete on the keyboard.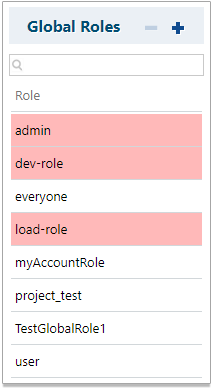
Click
Save.All changes to the Users, Global Roles and Project Roles columns are saved.
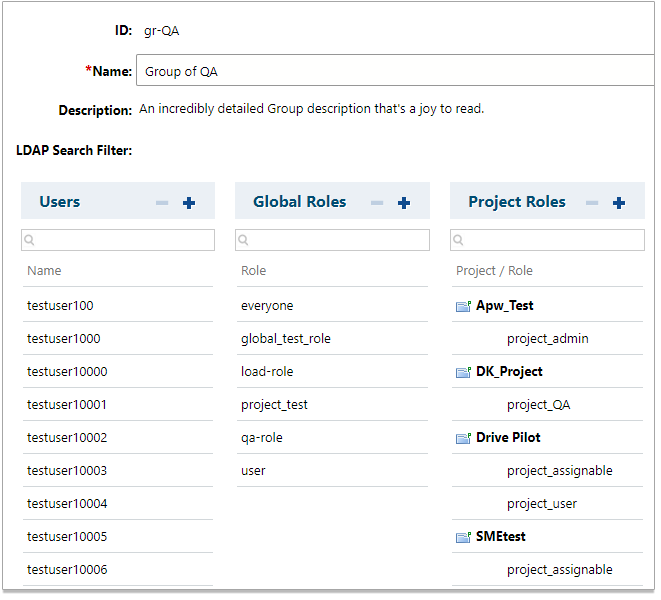
Assign Project Roles to a Group
Enter
Global Administration User Management and select Groups.Select a Group from the table of existing Groups.
The Group's details appear below.
Click
on the Project Roles header.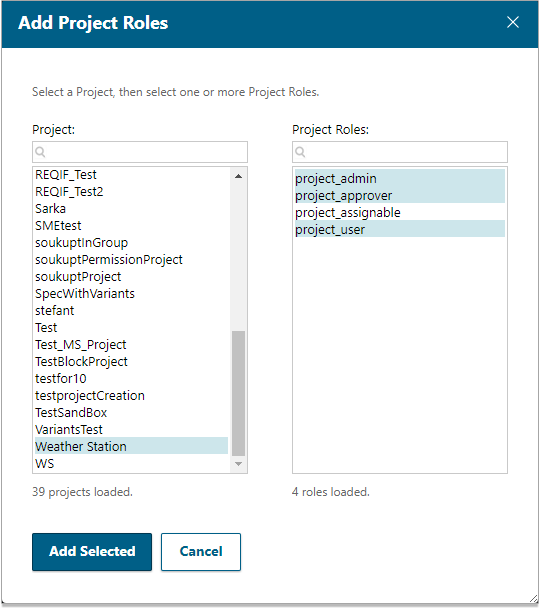
(The maximum number of Projects and Project Roles visible in the dialog box is configurable via a system property.)
(Optional) Enter a
 Project to search for in the
  field.
Select a
Project from the Project column.Available Project Roles for the selected
Project appear in the Project Role list.(Only a limited number of users are displayed in the dialogue. This number can be configured by administrators via a system property.)
Select one or more Project Roles.
Tip:This dialog supports multi-select.
Click Add Selected.
The selected Roles are added to the Project Roles column and highlighted in green.
Click
Save.All changes to the Users, Global Roles and Project Roles columns are saved.
Remove Project Roles from a Group
Enter
Global Administration User Management and select Groups.Select a Group from the table of existing Groups.
The Group's details appear below.
Select one or more
Projects and/or Project Roles and click or Delete on the keyboard.This dialog supports multi-select.
(Both
Projects and Project Roles can be removed simultaneously.)If a
Project is marked for removal, its child Project Roles are too.If the last Project Role from a
Project is marked for removal, then so is the Project. (The baugi1
Project in the example above will also be marked for removal.)
Click
Save.All changes to the Users, Global Roles and Project Roles columns are saved.
Sorting and filtering
Group lists are sorted alphabetically:
Users and
Projects by Name.Global and Project Roles by ID.
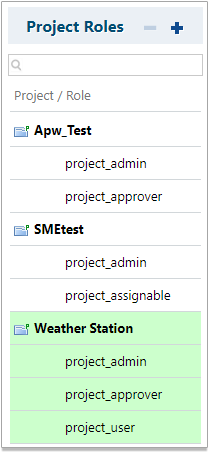
The Project Role list is structured into two levels;
It is sorted first by
Project Name. If there are multiple Users or
Projects with the same Name, then these items are sorted by ID.
The lists can be filtered using the
field at the top. (It filters results as you type.)Filtering in the Project Roles column works for both
Projects and Project Roles.A filtered
Project is always displayed with all its child Project Roles.A filtered Project Role is always displayed with its parent
Project.
Access File synchronization
The Access File is automatically synchronized when a Group change is Saved.
Administrators can view the Role, User and Group information that's stored in the access file at:
( Global Administration![]() User Management
User Management![]() Access Management).
Access Management).
The following can be both viewed and edited there:
The following can only be viewed there:
Users, Roles and Groups with "Read & Write" Permission
Users, Roles and Groups with "Read" Permission
This can grant members of a User Group the ability to access SVN folders through an external tool.
High Contrast View mode
If High Contrast View for the visually impaired is enabled:
Items marked for
addition have lined border.Items marked for
removal have a dashed border.
Users and Roles administration pages
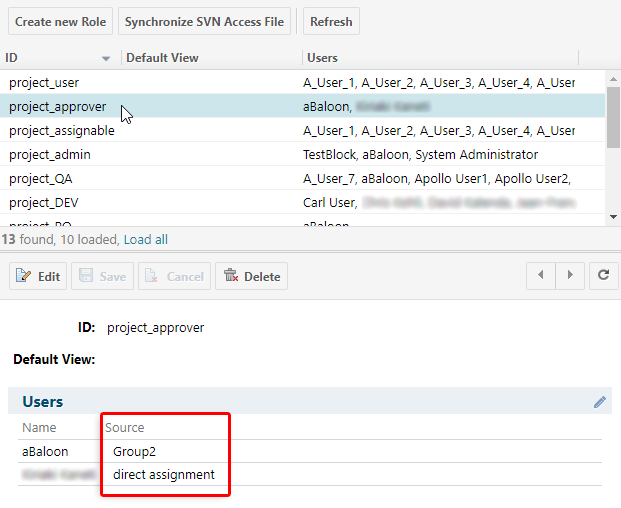
Because Roles can be assigned to Users either directly or via a User Group, it is important to know where it was done.
A Source column is visible in the Global Roles and Project Roles sections of the Users administration page and when a Role is selected on the Roles administration page.
User administration page: (Administration![]() User Management
User Management![]() Users)
Users)
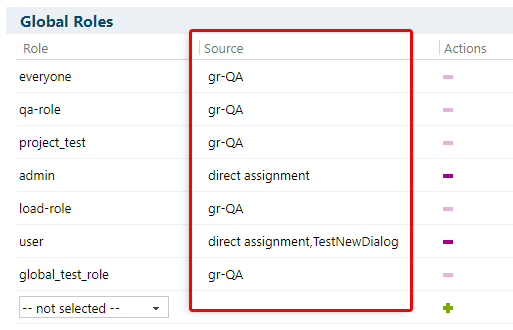
Roles can be assigned directly, and by one (or more) Groups.
(Direct assignments are listed first and Groups following in alphabetical order.)
Direct assignment: The Role was assigned directly to the user.
Other: The ID of the Group(s) that the Role was assigned from.
Only direct assignments can be removed on the Users administration page. (Remove  is disabled for Roles assigned by Groups here.)
Group assigned Roles must be removed on the Groups administration page.
Roles administration page: (Administration![]() User Management
User Management![]() Roles)
Roles)
The Source column is also visible in the users list that appears below a Role when you click on it.
Once again, Remove is disabled for Users assigned by Groups here and must be removed via the Groups administration page.
( Global Administration![]() User Management
User Management![]() Groups).
Groups).
Limitations
There are a couple of limitations in the current version of User Groups:
Use a browser other than Edge and Internet Explorer when working with Groups that contain thousands of Users or Roles.
When manually synchronizing on the LDAP Configuration page, the synchronization results report does not include changes done by queries on User Groups. It only displays changes done by the query that's configured there.
(For example, it might show 0 created users when some users were actually created via User Group synchronization.)