Microsoft Project import-export
You can import tasks from Microsoft Project into a new or existing Polarion project to create Polarion Work Items. You can also import MS Project milestones which become Time Points in Polarion. You should use Microsoft Project's export feature to export a project to an XML file. You will need to have this file available to in a location accessible to the computer on which you are accessing Polarion.
The following points are important to note:
Milestone summary tasks are imported as a Time Point and also as a Work Item, so that the grouping of its subtasks is preserved. Ordinary milestones are imported as Time Points only.
Imported milestone summary tasks and all subtasks are assigned to the corresponding Time Point.
All predecessors of a Milestone task (recursively, including their subtasks and predecessors of subtasks) are assigned to the corresponding Time Point. If more than one Time Point is found for a single task, the earliest one is assigned.
If all subtasks of a summary task are assigned to some Time Point, the summary task is also assigned to a Time Point, i.e. to the one with greatest time found in any subtask.
Custom Fields that are not configured are imported as the string type.
Field mapping is as follows:
MS Project Milestone | Polarion Time Point |
|---|---|
Name | name |
Notes | Description |
Finish | time |
To import Work Items from MS Project:
Create a new project or open the project in which you want to import Work Items from MS Project.
In the Navigation pane select the
 Work Items topic.
Locate the
 drop-down menu control on the toolbar above the Work Items table in the Table view.
Click the control and select Import from the menu. The Import Work Items dialog appears.
If you want to import only Work Items, select Without User Creation.xml in the Configuration field. If you want to import both Work Items and users, select Default.xml
Click the Browse button and use your file selection dialog to select the XML file exported from MS Project.
Click the Start button to run the import operation and import the Work Items (and users if you chose that option).
See also: Exporting Work Items: Exporting to Microsoft Project.
Export Work Items to Microsoft Project
The procedure to begin the export is basically the same as for exporting to a document. When you choose the option to export to MS Project, you have another option Export Time Points as Milestones. If selected, the Time Points to which at least one of the exported items is assigned, are exported as milestone tasks. Mapping of fields is the same as in case of import from MS Project.
Milestone predecessors are tasks that correspond to Work Items assigned to the relevant Time Point. Only the minimal set of predecessors' links is created: predecessors of predecessors are not direct predecessors of a milestone, and also subtasks of predecessors are not direct predecessors of milestones. Exported milestones are always top level tasks. They are inserted at the first possible top level position after all items that belong to the Time Point are exported.
To export a Project to MS Project:
Open the project you want to export (see: Access Projects).
If you want to export the entire Project, select the
Work Items topic in the Navigation panel. If you want to export a subset of the project, select an appropriate Shortcut in one of the Shortcuts topics, or execute an appropriate saved query, or a custom query built with the Query Builder in the Table view in Work Items.Note:Sort items by ID in ascending order:
If you want the output from Polarion to be exactly the same as the input from MS Project, then items need to be sorted by ID in ascending order.
(It is not sorted this way in Polarion by default.)
Click the
button in the toolbar and select Export in the menu. The Export Work Items dialog appears.Select the desired target format (xml: MS Project document) and character set and click OK. The document will be created and readied for download. When processing is finished the Download button appears in the dialog.
Click the Download button and choose the location to save the data file on your local system. The selected data is saved in an appropriate XML format which you can subsequently open in MS Project.
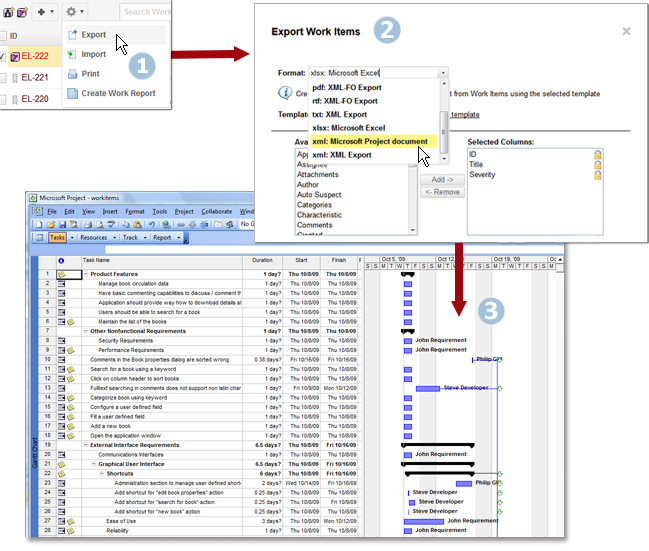
Exporting a Project to Microsoft Project
Opening the exported file in MS Project
The xml file that is created as a result of the Export to MS Project action should not be renamed with a .mpp extension before opening it in MS Project.
There are 2 ways to open the exported file in MS Project:
Using Windows Explorer context menu
Using MS Project File menu
To open the exported file using Windows Explorer:
Selecting the exported file in Windows Explorer
Right-click on the file and choose Open in on the context menu, followed by MS Project on the submenu;
To open the exported file from MS Project:
Open MS Project.
Open the Open File dialog.
Choose xml format, select the xml file, and click Open.
Choose the As new project option.