Customize the Work Items table
You can customize the table of Work Items that appears in the  Table,
  Tree,
Tree,  Live Plan, and
  Road Map views to show different Work Item fields as table columns. You can customize the table content for the current session, or create one or more saved column configurations which you can switch as needed. You can also change the default column layout for all users in the scope where you are working (project, project group, or repository), assuming you have the necessary permissions.
Administrators can adjust the maximum number of Work Items displayed in the tracker by adding the following property to the polarion.properties file:
(Where X is the maximum number of Work Items to display.)
The default setting in Polarion, (without using the above property), is 10,000.
Customize the current session
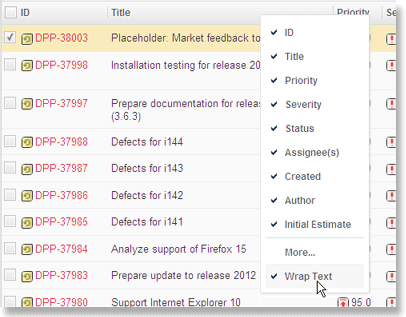
To quickly show or hide table columns for the current session, right-click on any column name. A menu appears listing all currently-shown columns. Columns currently visible in the table show a check mark. Click on a column name in this menu to switch its visibility for the current session.
You can show more columns in the table for the current session by clicking More in the menu and adding columns from the Available Columns list to the Columns Shown list of the Customize Work Items Table dialog box.
Create persistent table configurations
You can customize the Work Items table to show any set of columns in any desired order, specifying the sorting level and direction of any column. You can save any custom table configuration you create and reuse it any time. You can optionally save multiple named column configurations for different personal needs. If you have the necessary write permissions, you can save a custom table column configuration as the default for all users of the current project, project group, or repository, depending on which scope you are working in when you create the custom configuration.
Create a custom personal table column configuration:
Open the project, project group, or repository you want to customize.
In Navigation, select Work Items, and on the page toolbar select the
Table view if it is not already the current view.If you want to see the Table view of Work Items contained in a Document, open the Document and select Table on the Views menu.
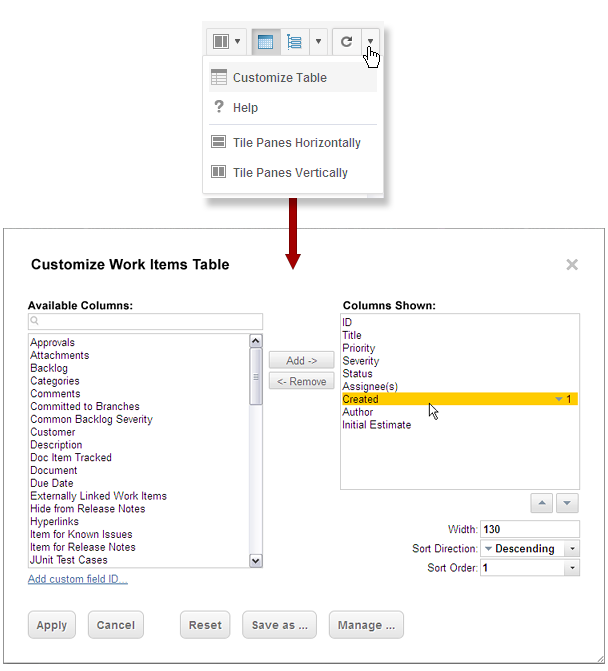
In the Table view, on the Page Actions menu, choose Customize Table (see screenshot above).
In the Customize Work Items Table dialog box, add columns from the Available Columns list to the Columns Shown list. You can also remove columns from the Columns Shown list until the list contains only the columns you want to show in the table when this columns configuration is invoked.
(Optional) Change the appearance order of columns in the Columns Shown list by selecting a column and changing its position in the list using the Up and Down arrow buttons (or keyboard shortcuts shown in tooltips). Top to bottom in the list corresponds to Left to Right in the table.
(Optional) Set properties for some or all columns. Select a column to show its properties settings.
Width: Displays the width of the column in pixels. Enter a whole number value such as 60.
Sort Direction: Specifies the sort direction of Work Items on one or more columns in the table. You can specify Ascending, Descending, or None. If the column is not included in the sort order, specifying the sort direction in this field adds the column to the sort order. To remove a column from the sort order, specify None.
Sort Order: Specifies the position of the sort order. Once a column is included in the sort, this field specifies its position in the sort order. Enter an integer value from 1 to the total number of columns in the Columns Shown list.
For example, if you wanted Work Items in the table sorted by Severity first and Priority next, you would specify 1 in this field for the Severity column, and 2 in this field for Priority column.
Click Save As to save the configuration of specified columns and column properties.
In the Save Custom Table Configuration dialog box, choose one of the following options:
Default for all users in scope: Saves your changes as the default table column layout and sorting for all users in the current scope (project, project group, or repository). Users are able to customize for the session or invoke their own saved column configurations.
Personal custom configuration: Saves your changes to a named personal table column configuration that you can invoke on the Work Items table any time. Specify a name in the Name field.
Click Save to complete the customization operation.
If the table-setting.xml configuration file is customized externally, and settings in the Customize Work Items Table dialog box are also changed, the settings from table-setting.xml are not reflected in the table. Only the settings in the dialog box are reflected. To also reflect settings from the configuration file, click Reset in the dialog box.
Wrapping text in table cells
The Description field of Work Items can contain tables. By default, the text in table cells does not wrap and the text in some cells may appear truncated when you browse the description. In this case you can switch the Wrap Text feature of Work Item tables.
In Navigation, click
 Work Items and select Table view.
If you are viewing a Document on the Document Editor toolbar, click the Views menu and choose
 Table.
In the
Table view of Work Items, right click on any column header in the upper part of the table of Work Items to display the Columns menu.On the Columns menu, choose Wrap Text. When text wrapping is active, a check mark appears in the menu items.