Create a new project from a template
Background information
Polarion products come with different sets of Project Templates. These range from a completely empty project with just basic Work Item types and placeholder content, to projects preconfigured especially for some type of development activity, for example, requirements management, agile software development, test management, or system engineering. These templates contain predefined key artifacts such as specification documents and reports, Work Item types, workflow, and other predefined configurations. The templates can provide a time-saving head start for projects of the type for which they were designed.
The list of available Project Templates is documented in Create New Project dialog box and Templates Screen. The default templates provided with Polarion products may be suitable for most projects as delivered. However, it is possible to customize any Project Template.
Procedure
The new project process creates a new folder in the repository. The New Project wizard asks you to specify the location of the new folder. You can familiarize yourself with the repository structure using the Repository Browser. The wizard provides a graphical interface to browse and select a parent folder.
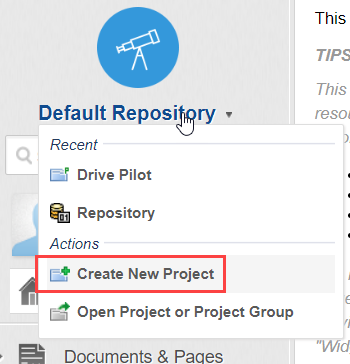
While logged on to Polarion, click Create New Project in the Navigation menu.
 Tip:
Tip:The action is also available in the Open Project or Project Group dialog box.
If the action does not appear, it means you do not have permission to create new projects.
The Create New Project dialog box appears.
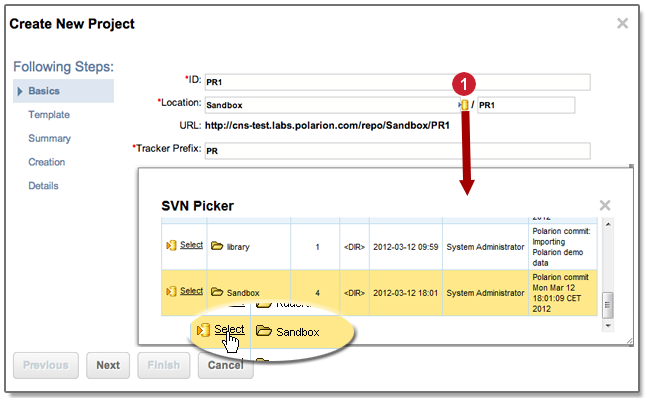
 Click icon to visually select repository location for new Project.
On the Basics page of the Create New Project dialog box, fill in the fields as follows:
ID: Enter a unique identifier for the project. Acceptable characters are a-z, A-Z, 0-9, underscore, dash, and period.
As you type the ID string, your entry is suggested as the name for the project's folder in the repository in the Location field.
Location: Specify the path and name of the root folder of the new project, referred to as the project folder, to be created in the repository. Note that any value you type for the path must be valid for use in a Subversion repository path. The URL label shows the full project path for the new project as a repository URL.
By default, the project folder is created under the repo folder. You can see this when you look at the URL. If you want to create the project under a different folder, you can either type in a path to the parent folder, or click the icon to launch the SVN Picker dialog box in which you can browse the repository folders and select one as the parent location for the new project.
Note:The Location and ID fields may be prefilled to a default value if system properties are so configured.
Tracker Prefix: Enter a value that is prefixed to the system-generated IDs of all new Work Items in the project. Generally you should limit the value to two to five characters that relate to the project name.
Caution:Specify a unique value that is not used in any other project. Otherwise, revisions may get linked to the wrong Work Item when developers using an external Subversion client cite Work Item IDs in commit messages to auto-link commits to their tasks in Polarion.
For example, if your project is named DrivePilot, you might enter DP as the Work Item prefix. The project's Work Items then have IDs like DP-279 assigned to them by Polarion. If project DrivePilot exists in your system, and you create a new project named DrivePal, you should not specify DP as the Tracker Prefix for DrivePal. If you do, then there could be two Work Items in the system with DP-3 as the ID. If a developer cites DP-3 in a commit message in an external client, the revision is linked to the first Work Item found by the system having that ID, which may or may not be the right one.
In this case you might specify a value like DPAL, giving DrivePal items IDs like DPAL-42.
Click Next to move ahead to the Template page of the dialog box.
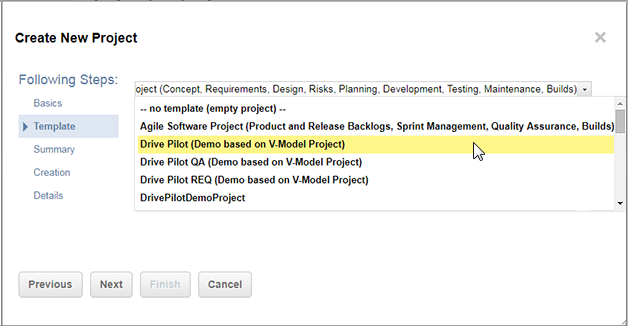
The figure above shows an example of the list of available templates. The actual templates listed vary depending on the product license you are using, and whether or not any custom templates have been created and added in the system configuration.
Select a template from the list of existing Project Templates. For information about the standard templates that come with Polarion, see Templates page.
Click Next. The Summary page appears showing the project parameters you selected. If you want to make any changes, click Previous.
When you are satisfied with the summary, click Next to create the project in the Repository. The Creation page appears showing a processing indicator. The time required to create the project depends on the content of the template and the current load on the server. Processing may take several minutes.
When the process is finished and the Creation page displays Project created, click Next. The Details page appears.
Edit the available project details as desired. For information on the fields, see Details page.
Tip:After the project is created, its details can only be modified by an administrator.
Click Finish to complete the procedure.
If a project is deleted, the settings for its location are preserved in the access control file of the internal Subversion repository. If you try to create another project in that same location, Polarion warns you and offers the possibility to overwrite the old settings. You should follow your administrator's policy on such overwrites.