Creating motion bodies and joints
In this tutorial, you will indicate which components of the model move by creating motion bodies. You will then create joints to indicate how the components move relative to each other, and add a harmonic motion driver to generate sinusoidal motion. Finally, you will solve the mechanism and analyze the results.

-
On your desktop or the appropriate network drive, create a folder named bar.
-
Click the link below.
-
Extract the files to your bar folder.
-
Start Simcenter 3D or NX.
Before starting the tutorial, you must download the part.
|
File |
 Open
Open
-
Navigate to the bar folder you created.
-
Files of type:
Part Files (*.prt)
-
File name
four_bar.prt
-
OK
The options you select in dialog boxes are preserved for the next time you open the same dialog box within a given session. Restore the default settings to ensure that the dialog boxes are in the expected initial state for each step of the activity.
|
File |
Preferences→User Interface
-
Options
-
 Reset Dialog Memory
 -
OK
![]() Motion Navigator
Motion Navigator
-
 four_bar
 -
 New Simulation
 -
New File Name
-
Name
four_bar_sim.sim
-
OK
New Simulation dialog box
-
Analysis Type
-
 Kinematics
 -
Component Options
-
 Component-based Simulation
 -
OK
Environment dialog box
A new simulation named four_bar_sim appears in the Motion Navigator, and the Simulation file appears in a separate tabbed window.
Create a motion body for each of the three bars that move.
![]() Motion Navigator
Motion Navigator
-
 four_bar_sim
 -
 New Motion Body
 -


-
Mass Properties Option
None

Because this is a kinematics simulation, mass properties are not required.
-
Name
ARM_1
Note:The names of motion objects (such as motion bodies) cannot contain spaces.
-
Apply
-
Repeat this procedure to create motion bodies for the other two components in the assembly, using the following names:
-
 BAR
BAR -
 ARM_2
ARM_2
The base of the mechanism is non-moving and should not be defined as a motion body.
-
-
Cancel
A revolute joint connects two motion bodies, or one motion body and “ground,” allowing one rotational degree of freedom.
 Joint (Home tab→Mechanism group)
-
Type
Revolute
-
Type Filter (Top Border bar)
Edge
-

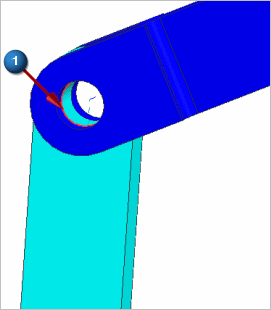
 Tip:
Tip:To use QuickPick to select the edge in ARM_1, hover over the part until an ellipsis appears next to the cursor. Then click the left mouse button and select Edge in ARM_1 from the list.
This single selection accomplishes three things:
-
Selects the action motion body (ARM_1).
-
Specifies the origin of the joint coordinate system, which defines the joint origin.
-
Specifies the Z-axis of the joint coordinate system, which defines the joint's orientation. A revolute joint revolves around the Z-axis of the joint coordinate system.
Tip:Using the right-hand rule, with your thumb pointing in the Z direction of the joint coordinate system, your curled fingers show you the default direction of the revolute joint. In this case, it is clockwise. The joint can rotate in either direction about its Z-axis, but the default direction determines important values such as the default direction of any motion driver applied to this joint.
You define values only in the Action group. This means the joint is fixed (that is, it defines motion between the motion body and ground).
-
-
Apply

Leave the Joint dialog box open for the next step.
The Joint dialog box is still open from the previous step.
-
Type
Revolute
-
(use QuickPick to select the edge in ARM_1)
-
Base
-
 Select Motion Body
 -
(select any part of the BAR component)

-
Apply

Repeat this procedure to create a third revolute joint between the edge in ARM_2 and the BAR component.
Leave the Joint dialog box open for the next step.
The Joint dialog box is still open from the previous step.
-
Type
Revolute
-
(use QuickPick to select the edge in ARM_2)

-
OK

You will add a harmonic driver to the mechanism. A harmonic driver generates sinusoidal motion.
![]() Motion Navigator
Motion Navigator
-
 Joints
 -
J001
-
Edit
-
Driver
-
Rotation
Harmonic
-
Amplitude
90
-
Frequency
360
-
OK
![]() Motion Navigator
Motion Navigator
-
four_bar_sim
-
New Solution
-
Solution Option
-
Solution Type
Normal Run
This solution type lets you perform a time-based animation of the mechanism.
-
Analysis Type
Kinematics/Dynamics
-
Time
1
-
Steps
50
The solver outputs motion data for animations and graphing at intervals called steps. You define the length of the simulation with a number of steps and a length of time in seconds. The values you defined specify that the animation runs for 50 animation frames over the course of one second.
-
Solve with OK
-
OK
-
 the Information window
There are redundant constraints in this model, which the solver ignores during the solve. This is a problem only if you want to capture reaction forces for the joints that the solver discards. To avoid redundant constraints, you could have used other combinations of joint types (for example, a cylindrical joint for J002 and a spherical joint for J003). However, this tutorial does not involve reaction forces, so the redundant constraints are not a problem.
|
Analysis |
![]() Animation (Motion group→Animation list)
Animation (Motion group→Animation list)
-
Settings
-
 30 (Animation Delay)
Setting the animation delay to about 30 slows the animation so that you can better observe the motion.
-
 Play
Play
-
-
You can set Play Mode to Loop
 or Retrace
  to cause the animation to continue until you click Pause
  or Stop
  .
.
-
Close
|
File |
-
Close→All Parts