Interactive Reports via Page Parameters
You can provide a limited level of interactivity in reports using Page Parameters. This is considered an advanced feature. It enables you to provide report viewers with some options for selecting the data they want to see. For example, you might enable users to select a date range for a trend chart or the number of rows they want to see in a table.
Page parameters can only be used with many of the Widgets, and some of their parameters. You can tell if a parameter can be associated with a page parameter by clicking the small gear icon displayed in its section of the Parameters sidebar, and then clicking Parameters to show the Page Parameter(s) compatible with that Widget Parameter, if any have been defined.
You can only have one Page Parameters Widget in a Page. You need to decide what parameter values you want report viewers to be able to change in which widgets, define Page Parameters for them, and specify all of them in the single allowed Page Parameters Widget.
For example, suppose a Page contains a multi line trend chart, one or two pie charts, and two tables. You might decide to allow report viewers to interactively specify:
A date range in the trend chart
The number of rows to show in the tables
Whether to show data labels in the pie charts.
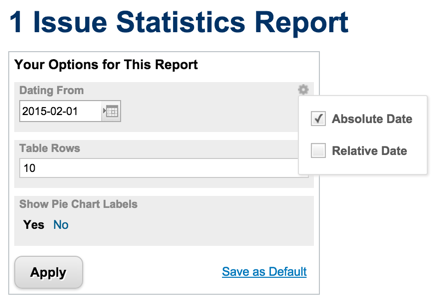
At runtime, the Page Parameter includes an action Save as Default. A user can change the values and click this link to have the changed values become the defaults. Other users accessing the page see the values in the Page Parameter widget.
Page parameter types
Assuming the Page is otherwise complete, with the Widget parameters all configured, the first step in providing user interactivity is to add the Page Parameters.
Three Page Parameters are needed for the example stated earlier in this topic. You add new Page Parameters using the Parameter button, which drops down a menu of data types:
String
Integer
Boolean
Enumeration
(Currently, only Enumeration Page Parameters support multi-select dialogs.)
Date
Each Page Parameter must correspond to the data type it will manipulate in the Widget(s). For example, to allow users to set a start date in a trend chart, the Page Parameter must be of the Date type. To allow users to specify the number of rows to show in a table Widget, the Page Parameter must be of integer type.
When creating a Page Parameter of type String, Integer, Boolean or Date you must specify two properties: Name and ID. Name is what report users see in the page. ID is the identifier used by the system. By default, the values are identical. The difference is that ID supports only ASCII characters. If you need the label to display a different character set, specify ID using only ASCII characters, and Label using your language's character set.
A Page Parameter of type Enumeration has several additional properties:
Scope: Default is the current project. You can optionally select Repository, or another project. The selection here determines the types available in the Work Item Types list and the enumerations available in the Enumeration field's pick-list.
Work Item Types: The types configured in the selected Scope appear in the list. The selection here affects the list of enumerations in the Enumeration field. Depending on the selection it may refine the list and filter out some of the items present as a result of the selection in Scope.
Enumeration: The enumerations (default and custom) for the selected Work Item type in the selected scope appear in the list.
Allow Multiple Values: Lets you select multiple values by the page developer, and later by the page user.
(Multiple value dialogs for Enumeration support multi-select.)
Allow No Values: Allows you to omit a value for the Page Parameter. The -- not selected – option appears to users in the drop-down list of enumeration values.
For example, you might want a Page Parameter to enable Page users to specify the specific types of Work Items planned in some Plan for some release... Requirements without Test Cases, for example.
The parameters needed for the example for this topic are:
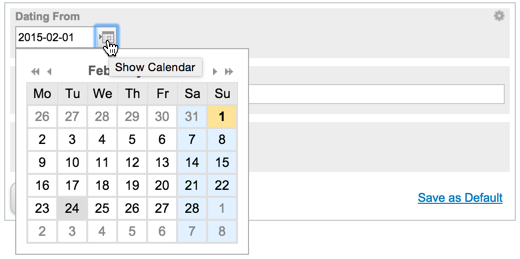
Parameter labeled Dating From of type Date.
Parameter labeled Show Pie Chart Labels of type Boolean (such as true/false and yes/no).
Parameter labeled Table Rows of type Integer.
Connect Page and Widget parameters
After defining the Page Parameters, they must be "connected" to the parameters of the Widgets they manipulate. For example, the Page Parameter Dating From needs to be connected to the Dates - From parameter of the multi line trend chart widget:
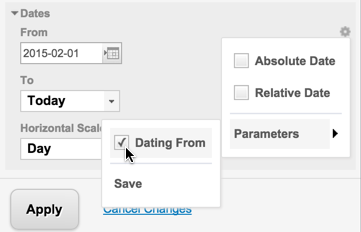
You can tell if the Widget can be manipulated via an existing Page Parameter by clicking the gear icon in a Widget parameter, and clicking again on Parameters. This displays the Page Parameters that are compatible with this Widget parameter. Check the Page Parameter you want to use. In this example, you can check Dating From to connect that Page Parameter to this Widget parameter. The end result for your report users is that they can select the start date in the date range rendered by the chart.
Several chart Widgets have Date type parameters. These can be either absolute or relative dates. Relative means the retrieved data is relative to some point in time, such as "Today", "2 weeks ago", or "6 months ago" rather than for some concrete data such as "January 22, 2014".
The report author can specify either or both for a Date type Widget parameter. A Page Parameter linked to such a Widget parameter renders the user's input options accordingly.
The process is the same for the other Page Parameters.
The Advanced
 Show Top Rows parameter of the Table Block Widget is set to 10 in the Widget parameters. By clicking the gear icon and Parameters, you can select the Table Rows parameter, connecting the Widget parameter to that Page Parameter. Report users can then change the number of rows displayed in the table.
The Show Data Labels parameter of the pie chart Widgets can be similarly connected to the previously defined Page Parameter labeled "Show Pie Chart Labels". By connecting both pie chart Widgets this way, the Page Parameter will manipulate both. Report users can then show or hide the pie chart labels.
Configure the Page Parameters widget
The final step is to add a Page Parameters - Block Widget to the Page. Recall that you can only have one of these Widgets on a Page. This is the element that provides visual controls for report users. Like other Widgets, this one has its own set of Widget parameters. For this example, they are set as follows:
Title: This is some short text to provide a hint for report users. For the example, the Title might be "Your Options For This Report".
Page Parameters: Select which of the defined Page Parameters you want report users to be able to see and use. Click the Select button, and in the Select Items dialog, select the Page Parameters the Widget should display for the list of defined Page Parameters.
Width: The width (in pixels) of the Widget in the report Page.
After saving the Page, users with permission to read Pages are able to view the Page and change the Page Parameters in the Widget to alter what they see in the connected Widgets in the Page.